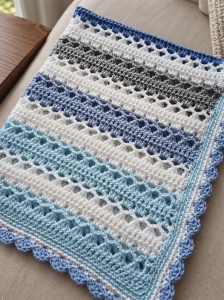
I especially like projects like this when I want something interesting enough that I do not get bored, but repetitive enough that I can actually relax while making it. Once the arches start appearing, there is something very satisfying about watching each new section line up with the one below it.
The pattern also works beautifully with two colors. Changing colors between sections makes the texture stand out even more, and carrying the unused yarn along the work means you do not necessarily have to cut it every time. That alone can save you from a rather impressive pile of ends to weave in later.
This would make such a lovely handmade baby shower gift too. There is something extra sweet about giving a blanket that you made yourself, especially one that can stay with a child for years. I can already imagine it folded over the side of a crib, tucked into a stroller, or used for those quiet little naps that somehow make every handmade stitch feel worth it.
And if you are newer to crochet, I would not let the arches intimidate you. The pattern starts with familiar stitches and introduces the decorative sections through a repeating sequence, so it is a nice project for someone who wants to move beyond a completely basic blanket without jumping into something overwhelming.
The original tutorial also describes it as suitable for beginners ready to try something a little more decorative.
Finished Size
Approximately 60 cm wide x 70 cm long
Materials
- Soft, lightweight baby yarn
- Approximately 400 g total
- Approximately 300 g in the main color
- Approximately 100 g in the contrasting color
- 3.0 mm crochet hook
- Yarn needle
- Scissors
The original tutorial uses two colors, with blue and cream and pink and white given as examples.
Abbreviations
ch = chain
ch-sp = chain space
sc = single crochet
dc = double crochet
dc2tog = double crochet 2 together
dc3tog = double crochet 3 together
st(s) = stitch(es
Pattern Notes
The foundation chain is worked in a multiple of 3 + 1.
The blanket begins with 130 chains.
Color changes are made at the end of the indicated row by completing the final yarn over with the new color.
You may carry the unused color neatly along the side of the work instead of cutting it after every color change.
The main stitch pattern is repeated until the blanket reaches the desired length.
Blanket
Foundation Chain
Ch 130.
Row 1
Dc in the 4th ch from hook and in each ch across.
Turn.
127 dc
Row 2
Ch 2.
Dc in next st, completing the beginning edge as a dc2tog.
Ch 4, dc3tog over next 3 sts.
Repeat from * to * until 2 sts remain.
Ch 4.
Dc2tog over final 2 sts.
Turn.
You should now have 43 clusters separated by 42 ch-4 spaces.
Row 3
Ch 4. The first 3 ch count as 1 dc and the remaining ch creates the first ch-1 space.
Sc in first ch-4 sp.
Ch 4, sc in next ch-4 sp.
Repeat from * to * across all remaining ch-4 spaces.
Ch 1.
Dc in final edge stitch.
Turn.
You should have 41 ch-4 spaces, with a ch-1 space at each edge.
This completed edge instruction is the part omitted from the source text. It is required for the following row to work evenly and for the stitch count to return to 127. The source itself only states that the ch-4 spaces are worked with sc and separated by ch 4.
Row 4
Change to the contrasting color while completing the final dc of Row 3.
Ch 3, turn. Ch-3 counts as first dc.
Dc in first ch-1 sp.
Work 3 dc in each ch-4 sp across.
Dc in final ch-1 sp.
Dc in 3rd ch of beginning ch-4 from the previous row.
127 dc
Row 5
Ch 3, turn. Ch-3 counts as first dc.
Dc in each remaining st across.
Change back to the main color while completing the final dc.
127 dc
Row 6
Repeat Row 2.
Row 7
Repeat Row 3.
Row 8
Repeat Row 4, changing to the contrasting color as established.
Row 9
Repeat Row 5, changing back to the main color in the final stitch.
The source instructs you to continue repeating the arch pattern until the blanket reaches the desired length.
Pattern Repeat
Continue repeating Rows 2 through 9 until your blanket reaches approximately 70 cm long, or your preferred length.
The sequence will continue like this:
Cluster Row → Arch Row → 3-dc Group Row → Solid dc Row
Then repeat the same four-row sequence again.
Changing Colors
To make a clean color change, begin the final stitch of the row with the current color.
Before completing the final yarn over, drop the current color and pull the new color through the remaining loops.
Continue with the new color on the following row.
If you prefer fewer ends to weave in, carry the unused yarn neatly along the edge until it is needed again. This is also the method recommended in the source tutorial.
Finishing
When the blanket reaches your desired length, fasten off.
Weave in all loose ends securely with a yarn needle.
Gently block the blanket if necessary to help the arches open evenly and give the edges a cleaner shape.
Important Note About the Border
The original PDF lists a 5 cm border in the blanket details, but it does not provide instructions for crocheting that border.
Once you understand the repeat, you can simply continue working until the blanket reaches the length you want. That also makes the design easy to adapt if you prefer a longer blanket or want to use the stitch pattern for another project later.
Download Crochet Baby Blanket with Arches PDF PATTERN
I hope you enjoy making this Crochet Baby Blanket with Arches as much as I enjoyed sharing it with you. Pick a couple of colors you love, get comfortable with your yarn and hook, and enjoy watching those little arches appear row by row. And as always, thank you for spending a little bit of your crochet time here with me at Grandma’s Crafts.