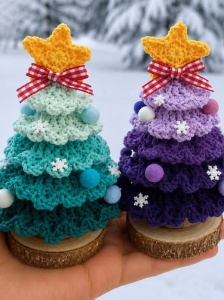
Welcome to Grandma’s Crafts! Today we’re sharing a festive project that is perfect for adding a handmade touch to your Christmas decorations. This Beautiful Crochet Christmas Tree Pattern creates a charming three-dimensional tree with layered branches, a sturdy trunk, and plenty of space for tiny ornaments, beads, bows, or any other decorations you would like to add.
One of the nicest features of this pattern is the layered construction. The main body of the tree is crocheted as a simple cone, while several rows are worked through the back loops only. This leaves the front loops available so the decorative branch layers can be added afterward, creating that full and textured Christmas-tree appearance.
Although the finished project looks detailed, the construction is made from familiar crochet techniques. The tree uses basic stitches, increases, decreases, and simple shell-style sections to form the branches. Working the project one stage at a time makes it much easier to follow, especially if this is your first time making a three-dimensional crochet decoration.
The shape gradually becomes narrower as you work toward the top, giving the tree a natural tapered silhouette. A small base inserted inside the lower section helps the finished piece stand more securely, while the stuffing gives the tree enough structure to keep its shape without making it feel overly firm.
The branch layers are really where this project comes to life.
Each one is crocheted directly into the front loops that were left unused earlier, starting with the widest layer near the bottom and becoming progressively smaller toward the top. Once all the layers are complete, they overlap slightly and create a lovely textured effect that resembles rows of soft evergreen branches.
There are so many ways to personalize your Beautiful Crochet Christmas Tree Pattern. You can use classic dark green yarn for a traditional look, choose lighter shades for a softer style, or even combine different greens throughout the branches. White yarn can also be added along the edges to create a snowy effect that looks especially pretty for winter décor.
Decorating the finished tree is another fun part of the project. Tiny beads can become Christmas ornaments, small bows can be sewn between the branches, and metallic thread can add a little sparkle. You can also finish the top with a crochet star, bell, bow, or any small decoration that matches the rest of your Christmas theme.
These crochet trees can be displayed almost anywhere in the home. They look lovely on shelves, side tables, mantels, dining tables, or as part of a larger Christmas centerpiece. Making several trees in different sizes or shades of green can also create a beautiful little handmade Christmas forest.
This project can also be a wonderful way to use leftover yarn and small craft supplies from previous projects. Because the decorations require only tiny amounts of material, even small scraps of yarn, ribbon, beads, or metallic thread can be turned into charming finishing details.
This beautiful three-dimensional crochet Christmas tree is worked from the trunk upward. The main tree forms a stuffed cone, while seven decorative crochet layers are added afterward using the front loops intentionally left free during the body.
The finished tree can be decorated with beads, tiny ornaments, bows, stars, bells, or any other lightweight Christmas embellishments.
Materials
Green worsted or DK weight yarn
Brown yarn for the trunk
Optional contrasting green, white, or mint yarn for the branches
3.0–3.5 mm crochet hook, or a size suitable for your yarn
Polyester fiberfill
Yarn needle
Scissors
Stitch marker
Small piece of firm cardboard or plastic canvas for the base
Optional beads, mini ornaments, bows, bells, or star
Abbreviations
MR – magic ring
ch – chain
sl st – slip stitch
sc – single crochet
dc – double crochet
inc – 2 sc in the same stitch
dec – single crochet 2 stitches together
BLO – back loop only
FLO – front loop only
st / sts – stitch / stitches
Rnd – round
FO – fasten off
Important Notes
The trunk and tree body are worked in continuous rounds. Do not join unless instructed.
Place a stitch marker in the first stitch of each round.
When a round says BLO, crochet only through the back loop of every stitch. The unused front loops must remain visible because you will return to them later to crochet the branches.
Do not accidentally crochet over those free front loops in the following rounds.
Gauge is not critical, but keep your tension firm enough that the stuffing does not show.
PATTERN INSTRUCTIONS
Trunk
Using brown yarn:
Rnd 1
6 sc in MR. (6)
Rnd 2
Inc in each st around. (12)
Rnd 3 – BLO
Sc in BLO of each st around. (12)
This creates a small edge around the bottom of the trunk.
Rnds 4–6
Sc in each st around. (12)
Do not fasten off.
Change to green yarn at the end of Round 6.
Main Tree Body
Rnd 7
Inc in every st around. (24)
Rnd 8
[Sc in next 3 sts, inc] ×6. (30)
Rnd 9
[Sc in next 4 sts, inc] ×6. (36)
Rnd 10
[Sc in next 5 sts, inc] ×6. (42)
Rnd 11
[Sc in next 6 sts, inc] ×6. (48)
You now have the widest part of the tree.
Rnd 12
Sc around. (48)
Rnd 13 – BLO
Sc in BLO around. (48)
Leave all 48 front loops free. This will become Branch Layer 1.
Rnd 14
Sc around through both loops. (48)
Rnd 15
[Sc in next 6 sts, dec] ×6. (42)
Rnd 16
Sc around. (42)
Rnd 17 – BLO
Sc in BLO around. (42)
Leave the front loops free for Branch Layer 2.
Rnd 18
Sc around. (42)
Rnd 19
[Sc in next 5 sts, dec] ×6. (36)
Rnd 20
Sc around. (36)
Rnd 21 – BLO
Sc in BLO around. (36)
Leave the front loops free for Branch Layer 3.
Rnd 22
Sc around. (36)
Rnd 23
[Sc in next 4 sts, dec] ×6. (30)
Rnd 24
Sc around. (30)
Rnd 25 – BLO
Sc in BLO around. (30)
Leave the front loops free for Branch Layer 4.
Rnd 26
Sc around. (30)
Rnd 27
[Sc in next 3 sts, dec] ×6. (24)
Rnd 28
Sc around. (24)
Rnd 29 – BLO
Sc in BLO around. (24)
Leave the front loops free for Branch Layer 5.
Rnd 30
Sc around. (24)
Rnd 31
[Sc in next 2 sts, dec] ×6. (18)
Rnd 32
Sc around. (18)
Rnd 33 – BLO
Sc in BLO around. (18)
Leave the front loops free for Branch Layer 6.
Rnd 34
Sc around. (18)
Rnd 35
[Sc in next st, dec] ×6. (12)
Rnd 36
Sc around. (12)
Rnd 37 – BLO
Sc in BLO around. (12)
Leave the front loops free for Branch Layer 7.
Rnd 38
Sc around. (12)
Adding the Base and Stuffing
Before closing the top, place the tree upright on a piece of cardboard.
Trace around the widest lower portion of the green tree and cut a circle slightly smaller than the crocheted base.
Insert the cardboard circle inside the tree so it rests directly above the trunk section.
This gives the tree a flatter and more stable bottom.
Begin stuffing firmly.
Add the fiberfill gradually and distribute it evenly around the cone.
Pay special attention to the sides so the finished tree remains symmetrical rather than leaning.
Do not overstuff the very tip.
Closing the Top
Rnd 39
Dec around. (6)
Finish stuffing if necessary.
FO, leaving a yarn tail.
Thread the tail through the front loops of the remaining 6 stitches and pull tightly to close.
Weave in the end.
You should now have a plain green cone with seven visible horizontal rows of unused front loops.
And now comes the part that actually makes it look like a Christmas tree. 😌
Crochet Branch Layers
The branch layers are worked separately into the free front loops from:
Round 13 – 48 loops
Round 17 – 42 loops
Round 21 – 36 loops
Round 25 – 30 loops
Round 29 – 24 loops
Round 33 – 18 loops
Round 37 – 12 loops
We will use the same simple shell pattern for every layer.
Branch Shell
One branch shell uses 3 front loops:
Sl st in first FLO, 5 dc in next FLO, sl st in next FLO.
That is one complete shell.
Because every branch round has a stitch count divisible by 3, the pattern will close perfectly without leftover loops.
Branch Layer 1 – Bottom Layer
Hold the tree with the trunk facing downward.
Locate the free front loops from Round 13.
Attach green yarn to any front loop.
Repeat around:
Sl st in next FLO, 5 dc in next FLO, sl st in next FLO.
Repeat until you return to the beginning.
You will make:
16 shells
Join with a sl st if necessary.
FO and weave in the ends.
This is the widest branch layer.
Branch Layer 2
Attach yarn to the free front loops from Round 17.
Repeat the same shell pattern:
Sl st, 5 dc in next FLO, sl st.
Work around.
14 shells
FO.
Branch Layer 3
Work into the free front loops from Round 21.
Repeat the shell pattern around.
12 shells
FO.
Branch Layer 4
Work into the free front loops from Round 25.
Repeat the shell pattern around.
10 shells
FO.
Branch Layer 5
Work into the free front loops from Round 29.
Repeat the shell pattern.
8 shells
FO.
Branch Layer 6
Work into the free front loops from Round 33.
Repeat the shell pattern.
6 shells
FO.
Branch Layer 7 – Top Layer
Work into the free front loops from Round 37.
Repeat:
Sl st in first FLO, 5 dc in next FLO, sl st in next FLO.
4 shells
FO and weave in the ends.
Shaping the Branches
Once all seven layers are finished, gently pull each shell downward with your fingers.
Begin with the bottom layer and work upward.
Do not flatten the shells completely. Allow them to overlap slightly so that every tier covers part of the cone beneath it.
This overlapping effect creates the full, layered Christmas-tree shape.
If necessary, lightly steam-block the branch edges, but avoid pressing the tree flat.
Optional Snow-Tipped Version
For a snowy Christmas tree, work the main body in dark green and make the branch layers in a slightly lighter green.
Then add a final decorative edge using white yarn.
Attach white yarn to the outer edge of a branch shell and work small slip stitches or single crochets across selected shell tops.
You do not need to cover every stitch. Irregular patches actually make the snow effect look more natural.
Decorating the Tree
Once the crochet is complete, you can decorate the tree however you like.
Good options include:
Small beads
Tiny Christmas balls
Miniature bows
Bells
Pearls
Sequins
Crochet stars
Tiny pom-poms
Thin metallic thread
Miniature lights made from colored beads
Sew decorations securely rather than relying on glue whenever possible.
For a traditional look, place the decorations randomly rather than in perfectly straight lines.
Optional Tree Topper
You can finish the tree with a small crochet star, bow, bell, or decorative bead.
Attach the topper directly to the closed tip of the tree using several secure stitches.
If the topper is slightly heavy, insert your needle through several rounds near the tip rather than attaching it only to the final six stitches.
Final Finishing
Place the finished tree on a flat surface.
Check that the cardboard base sits evenly and that the trunk is centered.
Gently reshape the cone if necessary.
Arrange all seven branch layers so that they overlap naturally, with the widest branches at the bottom and progressively smaller layers toward the top.
Weave in every remaining yarn end.
VIDEO TUTORIAL
We hope you enjoy making this Beautiful Crochet Christmas Tree Pattern and adding your own creative touches to the final design. Handmade Christmas decorations always bring a special feeling to the season, and this project is a lovely way to create something festive that you can bring out and enjoy year after year.
Thank you for visiting Grandma’s Crafts! Be sure to explore the other patterns available here on the blog for more creative crochet ideas, seasonal projects, and handmade inspiration. We’re always adding new patterns and updating the blog throughout the week, so there is always something new to discover.