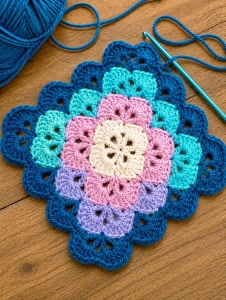
Welcome to Grandma’s Crafts! I’m so happy you are here today. I have a really beautiful blanket to share with you, especially if you enjoy crochet patterns that look a little more complicated than they actually are. This Textured Shell Square Blanket grows from the center outward, and every new round adds another layer of those lovely little shells.
What caught my attention immediately was the texture. The shells almost look like they are sitting on top of one another, creating this soft, raised effect that becomes more noticeable as the blanket grows.
It is one of those patterns that you really want to touch when you see it finished, and I think that is always a good sign with a crochet blanket.
The construction is also quite fun because you are not working back and forth in long rows. You start right in the center and build the blanket outward in a square, adding more shells to each side as you go. I love projects made this way because you can actually watch the shape grow in your hands, and you never have to decide the final size before you begin.
Another thing I really like about this pattern is how much you can play with color. You could make the whole blanket in one soft neutral shade and let the texture do all the work, or change colors every few rounds and make each layer of shells stand out. I think it would also look beautiful with several shades from the same color family, almost like a gradual ombré effect.
How This Blanket Comes Together
The pattern alternates between a shell round and a textured round. The shell rounds create the basic shape, while the following rounds add more stitches into the center of those shells and give them that fuller, clam-like appearance. Once you understand how the corners and side shells are placed, the blanket starts to develop a really nice rhythm.
And this is where the pattern gets especially useful. Every new repeat adds one more shell to each side of the square, so you can simply keep going until the blanket is the size you want. Make a small baby blanket, continue for a cozy lap blanket, or keep adding rounds until you have a large throw for the sofa or bed.
I also think this would be a lovely pattern for using yarn you already have at home. You could use two colors, several colors, or even work through leftover skeins and create a completely different look with every layer. Patterns like this are wonderful when you want something creative without having to plan every single color before you start.
If you are newer to working blankets in the round, just pay a little extra attention to the four corners during the first few repeats.
Those corner shells are what keep the blanket growing into a square, while the side shells gradually fill the space between them. After a few rounds, you will begin to recognize the placement almost without thinking about it.
This textured square blanket is worked from the center outward. Each repeat adds another shell to every side, so you can continue crocheting until the blanket reaches exactly the size you want.
The pattern alternates a Shell Round with a Textured Round, creating raised clam-like shells throughout the blanket.
VIDEO TUTORIAL
Materials
Yarn in any weight you prefer
Crochet hook appropriate for your yarn
Scissors
Yarn needle
A smooth yarn works especially well because it allows the textured shells to remain clearly visible.
Abbreviations
ch = chain dc = double crochet sc = single crochet sl st = slip stitch st(s) = stitch(es) sk = skip rnd = round RS = right side WS = wrong side MR = magic ring
Special Stitches
Corner Shell
Work 7 dc in the indicated stitch.
Side Shell
Work 5 dc in the indicated stitch.
Textured Side Shell
Working across the 5 dc of a Side Shell:
Dc in each of the first 2 dc, work 3 dc in the center dc, then dc in each of the final 2 dc.
7 dc
Textured Corner Shell
Working across the 7 dc of a Corner Shell:
Dc in each of the first 2 dc, 2 dc in next dc, 3 dc in center dc, 2 dc in next dc, then dc in each of the final 2 dc.
11 dc
The center stitch of each Textured Corner Shell will be important on the following Shell Round.
Blanket Center
Round 1
Make a MR.
Ch 3, which counts as first dc.
Work 15 dc into the ring.
Join with sl st to top of beginning ch-3.
16 dc
Pull the ring closed securely.
First Shell Repeat
Round 2
With RS facing:
Work a Corner Shell in first st.
Sk next st, sc in next st, sk next st.
Repeat this sequence around:
7 dc in next st, sk next st, sc in next st, sk next st.
Join with sl st to first dc.
You should have:
4 Corner Shells and 4 sc
Turn.
Round 3
With WS facing:
Work a Textured Corner Shell across the 7 dc of the first Corner Shell.
Sc in next sc.
Repeat around, working a Textured Corner Shell across each 7-dc shell and 1 sc in each sc.
Join with sl st.
You should now have:
4 Textured Corner Shells, each containing 11 dc, and 4 sc
Turn.
Second Shell Repeat
Round 4
With RS facing, locate the center dc of a Textured Corner Shell.
Work 7 dc in that center stitch.
This forms the new Corner Shell.
Now work:
Sk next 2 sts, sc in next st, sk next 2 sts.
Work 5 dc in next sc.
Sk next 2 sts, sc in next st, sk next 2 sts.
The next stitch will be the center dc of the next Textured Corner Shell.
Repeat this sequence around.
Join with sl st to first dc.
You should now have:
4 Corner Shells 1 Side Shell on each side 2 sc between each pair of corners
Turn.
Round 5
With WS facing:
Work a Textured Corner Shell across each 7-dc Corner Shell.
Sc in next sc.
Work a Textured Side Shell across the next 5-dc Side Shell.
Sc in next sc.
Repeat around.
Join with sl st.
Turn.
Third Shell Repeat
Now the growth becomes easy to see.
Each new Shell Round will add one additional Side Shell to every side of the blanket.
Round 6
With RS facing:
Work 7 dc in the center dc of the next Textured Corner Shell.
Sk next 2 sts, sc in next st, sk next 2 sts.
Work 5 dc in next sc.
You will now reach the existing Textured Side Shell.
Sk the first 3 dc of that shell.
Sc in the center dc.
Sk the final 3 dc.
Work 5 dc in next sc.
As you approach the next corner:
Sk next 2 sts, sc in next st, sk next 2 sts.
Work 7 dc in the center dc of the next Textured Corner Shell.
Continue this sequence around.
You now have:
4 Corner Shells 2 Side Shells per side
Turn.
Round 7
With WS facing:
Work a Textured Corner Shell across every Corner Shell.
Sc in each sc.
Work a Textured Side Shell across every Side Shell.
Continue around and join.
Turn.
Continuing the Blanket
From this point onward, repeat the same two-round sequence.
Shell Round
With RS facing:
Work 7 dc in the center dc of every Textured Corner Shell.
Immediately after a corner:
Sk 2 sts, sc in next st, sk 2 sts.
Work 5 dc in the next sc.
For every existing Textured Side Shell along the side:
Sk 3 dc, sc in the center dc, sk 3 dc.
Work 5 dc in the next sc.
After the final Side Shell:
Sk 2 sts, sc in next st, sk 2 sts.
The next stitch is the center of the following Textured Corner Shell.
Work the next Corner Shell there.
Repeat around.
Every time you work this round, the blanket gains one new Side Shell per side.
So the growth looks like this:
Repeat
Side Shells per Side
1
0
2
1
3
2
4
3
5
4
6
5
7
6
Continue in the same way for as many repeats as you need.
Textured Round
Turn to WS.
Across every 7-dc Corner Shell, work the 11-dc Textured Corner Shell.
Sc in each separator sc.
Across every 5-dc Side Shell, work the 7-dc Textured Side Shell.
Continue around.
Join and turn.
Changing Colors
You can work the entire blanket in one color, or change yarn after any completed Textured Round.
Changing color every two rounds makes each layer of shells stand out beautifully.
You can also use several shades from the same color family for a softer gradient effect.
Sizing
There is no fixed finished size.
Simply continue repeating the Shell Round and Textured Round until the blanket is as large as you want.
Because the blanket grows evenly from the center outward, the same instructions can be used for a small baby blanket, a lap blanket, or a larger throw.
Finishing
After completing your final Textured Round, fasten off.
Use a yarn needle to weave in all remaining ends securely.
Gently block the blanket if necessary, paying particular attention to the four corners so the square shape sits evenly.
One of my favorite things about textured crochet is how different the finished piece can look depending on the yarn. A smooth yarn will show every shell very clearly, while a softer yarn can give the blanket a more delicate and cozy appearance. There really is a lot of room to make this pattern your own.
And do not feel like you have to rush through this one. I think this is the kind of blanket that is nicest when you simply enjoy the repeat, add another round when you have some quiet time, and let it slowly grow. Before you know it, you will have a beautiful square blanket sitting in your lap.
I hope you enjoy making this Textured Shell Square Blanket and experimenting with your own colors along the way. Patterns that grow from the center are always a little addictive because it is so easy to say, “just one more round,” and suddenly your blanket is much bigger than you planned! Thank you for spending some crochet time here with me at Grandma’s Crafts, and I hope this one finds a place on your project list.