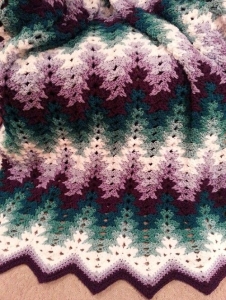
Welcome to Grandma’s Crafts! I’m so happy you stopped by today. If you have a soft spot for colorful blankets with plenty of texture, I think this one is going to catch your attention right away. The Grandma Spiked Ripple Blanket has that classic wavy look we all know and love, but the little pointed details between the colors make it feel completely different from an ordinary chevron blanket.
What I really like about this pattern is how much the colors become part of the design. Every new section adds another layer to those ripples, and the spike stitches reach down into the previous rows to create that beautiful pointed effect between them. The more contrast you use between your yarn colors, the easier those details are to see.
There is something very satisfying about ripple blankets in general. Once those peaks and valleys start lining up, you almost want to keep adding another row just to see the pattern grow. This one has enough repetition to become relaxing after you understand the stitch placement, but the spike stitches keep it interesting along the way.
The sample blanket measures approximately 40 by 36 inches, which makes it a lovely size for a baby or child blanket. The pattern uses worsted weight yarn and a 5.0 mm crochet hook, although the size is very easy to customize because each complete ripple repeat uses 18 stitches.
And this is definitely one of those patterns where I would have far too much fun choosing the yarn. You can go with soft neutrals for something calm and cozy, use several shades of the same color for a beautiful gradient effect, or pull out all those colorful skeins you have been saving and make every section different. The original sample uses seven colors, but the pattern also works if you change colors more or less frequently.
The special detail here is the spike stitch. It is made with a group of double crochets, with the center stitch reaching down into a lower row. That longer stitch is what creates those little points dipping into the previous color and gives the blanket its distinctive look. It may seem unusual the first time you make one, but once you see where the hook needs to go, the repeat becomes much easier to recognize.
I also love that you are not locked into one particular blanket size. The pattern explains how to calculate the starting chain or foundation single crochet according to the width you want, so you can make anything from a baby blanket to a much larger afghan. The same stitch pattern can even be adapted for scarves or wraps.
This beautiful ripple blanket combines classic groups of double crochet with an elongated spike stitch that creates the distinctive pointed color effect between the rows.
Finished Size
The sample blanket measures approximately 40″ x 36″, making it a lovely size for a baby or child blanket.
Materials
Worsted weight yarn
100% acrylic yarn works well for this pattern
US H/8, 5.0 mm crochet hook
Yarn needle
Scissors
Stitch marker, optional
For the clearest spike stitch definition, choose a smooth yarn with little or no halo. Fuzzy or eyelash-style yarns may hide the elongated stitches.
Gauge
Gauge is not critical for this pattern.
The most important thing is to maintain an even tension throughout your work.
Abbreviations
ch = chain sl st = slip stitch sc = single crochet dc = double crochet fsc = foundation single crochet spst = spike stitch sk = skip st(s) = stitch(es) sp = space rep = repeat
Spike Stitch
The spike stitch used in this pattern is actually a group of three double crochets with the center stitch extended into the row below.
To make a spst:
Dc in the indicated space.
Work a loose dc between the second and third dc of the row two rows below your current row.
Dc again in the same space as the first dc.
If the center dc pulls the fabric too tightly, work it loosely or substitute a treble crochet for that center stitch.
Choosing Your Blanket Width
Each ripple repeat uses 18 stitches.
Because the ripple pulls the fabric inward, your starting width will be wider than the finished blanket.
To estimate the number of repeats you need, make one sample repeat first and measure its finished width.
Divide your desired blanket width by the width of that sample repeat.
Then use one of the following formulas:
Starting chain: Number of repeats × 18 + 7
Foundation single crochet: Number of repeats × 18 + 4
For example, 12 repeats require:
12 × 18 = 216
Starting chain: 216 + 7 = 223 chains
Foundation single crochet: 216 + 4 = 220 fsc
Option 1: Starting With a Foundation Chain
Using Color A, ch the required number of stitches according to the formula above.
Row 1
Work 3 dc in the 7th ch from hook.
The skipped chains create the beginning edge.
Repeat the following across:
Sk next 2 ch, 3 dc in next ch.
Repeat once more.
Sk next 5 ch.
3 dc in next ch, sk next 2 ch.
Repeat once more.
Work (3 dc, ch 3, 3 dc) in next ch to form the peak.
Continue repeating this ripple sequence across the foundation chain.
Row 2
Ch 5, turn.
Work 3 dc in first ch-3 sp.
Work 3 dc in each of the next 2 spaces.
Sk next space. This forms the valley.
Work 3 dc in each of the next 2 spaces.
Work (3 dc, ch 3, 3 dc) in next ch-3 sp.
Repeat this sequence across.
Finish with (3 dc, ch 3, 3 dc) in the final edge ch-sp.
Do not turn yet.
Fasten off Color A.
Join Color B with a sl st in the top of the final dc.
Option 2: Foundation Single Crochet
If you prefer to begin with fsc, work the number of foundation stitches calculated using:
Number of repeats × 18 + 4
Row 1
Ch 5, turn.
Sk next 2 fsc.
Work 3 dc in next fsc.
Repeat the ripple sequence:
Sk next 2 sts, 3 dc in next st.
Repeat once more.
Sk next 5 sts.
3 dc in next st, sk next 2 sts.
Repeat once more.
Work (3 dc, ch 3, 3 dc) in next st.
Continue the sequence across.
Row 2
Ch 5, turn.
Work 3 dc in first ch-3 sp.
Work 3 dc in each of next 2 spaces.
Sk next space.
Work 3 dc in each of next 2 spaces.
Work (3 dc, ch 3, 3 dc) in next ch-3 sp.
Repeat across.
Finish with (3 dc, ch 3, 3 dc) in final edge ch-sp.
Fasten off Color A without turning.
Join Color B with a sl st in the top of the final dc.
Spiked Ripple Rows
Row 3
With Color B:
Ch 5, turn.
Work 3 dc in first ch-3 sp.
Now begin the spike section.
Work spst in each of the next 2 spaces.
Sk the next space at the bottom of the valley.
Work spst in each of the next 2 spaces.
Work (3 dc, ch 3, 3 dc) in next ch-3 sp.
Repeat across:
2 spst, skip valley space, 2 spst, peak
Finish with the peak group in the final edge space.
The written page says “single crochet” in this section, but the accompanying symbol chart marks these stitches as spst, which is consistent with the name and construction of the pattern.
Row 4
Repeat Row 3 using the same color.
At the end of the row, fasten off.
Do not turn until the next color has been joined.
Join the next color with a sl st in the top of the final dc.
Rows 5 and Beyond
Repeat Rows 3 and 4, changing colors after every two rows.
Continue until the blanket reaches your desired length.
You can also experiment with working one, three, or four rows of each color instead of two.
Border
Weave in all loose ends before beginning the border.
Border Round 1
Join your border color along one side of the blanket.
Work 2 sc into the side of each dc row evenly down the first side.
When you reach the foundation edge, work evenly across while maintaining the ripple shape.
At each peak, work:
(sc, ch 2, sc)
Between peaks:
Sc in next 8 sts.
Sk the stitch at the lowest point of the valley.
Sc in next 8 sts.
Repeat across the foundation edge.
At the final peak, work (sc, ch 2, sc).
Continue with 2 sc into the side of each dc row along the second side.
Across the final ripple edge, continue shaping the peaks and valleys to match the blanket.
At each peak ch-sp, work the corner increase around the ch-2 or ch-3 area.
At each valley, skip the center stitches as established so the ripple remains flat.
Join with sl st to first sc.
Border Round 2
Ch 1, turn.
Turning this round helps smooth the border.
Sc in each stitch along the straight sides.
At each ch-2 peak space, work:
(sc, ch 2, sc)
Sc in next 8 sc.
Sk next 2 sc at the valley.
Sc in next 8 sc.
Repeat across each ripple edge.
Continue around the remaining sides.
Join with sl st to first sc.
Fasten off here if you do not want a third border round.
Border Round 3, Optional
Ch 1.
Make sure the side you want as the front of the blanket is facing you.
Sc evenly in each stitch around, maintaining the ch-2 peak spaces.
Join with sl st to first sc.
Fasten off and weave in the remaining ends.
Finishing
Weave in all remaining yarn tails.
Gently block the blanket if needed to help define the ripple shape and allow the spike stitches to sit evenly.
Once the main blanket is finished, you can add the border to give all those ripples a neat finished edge. I think that final round makes such a difference on a colorful blanket like this because it frames the whole design and brings all the different shades together.
VIDEO TUTORIAL
There is also a crochet chart available for this pattern, which can be especially helpful if you are someone who likes to see the stitch placement instead of relying only on written instructions.
This would make such a lovely handmade gift, especially because you can choose the colors specifically for the person receiving it. And honestly, I think it is one of those blankets that looks much more complicated than it feels once you settle into the repeat.
So gather a few colors you love, find a comfortable spot with your hook and yarn, and enjoy watching those ripples grow row by row. I hope you have as much fun making your Grandma Spiked Ripple Blanket as I did sharing it with you. And as always, thank you for spending a little of your crochet time here with me at Grandma’s Crafts.