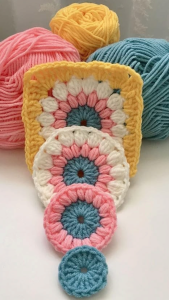
Welcome to Grandma’s Crafts! I’m so happy you are here today. I have a square to share with you that I never get tired of making: the Sunburst Granny Square. It starts as a little circle of double crochet, blooms into a ring of puffs, and then settles into a tidy square, all in just four rounds.
What I love most is how the colors behave. The center, the puffs and the clusters each get their own shade, so every square looks like a tiny flower or a little sun. Make a pile of them in warm yellows and golds and they look cheerful and sunny. Switch to soft blues and creams and the very same pattern turns calm and cozy.
The Sunburst Granny Square is also a wonderful way to learn two stitches that show up again and again in crochet: the puff stitch and the cluster. They sound fancy, but they are just a few loops pulled up and closed together, and I will walk you through both before we start.
Once you have one square finished, you can stitch them into a blanket, a pillow cover, a tote bag or even a cardigan. So grab four colors from your yarn basket, find a cozy spot, and let’s make our first one together.
Skill Level
Easy. If you can make a magic ring and a double crochet, you are ready for this square.
Materials
Worsted weight (#4) yarn in 4 colors (Color A for the center, Color B for the puffs, Color C for the clusters and Color D for the outer round)
5 mm (H-8) crochet hook
Scissors
Tapestry needle for weaving in ends
With worsted weight yarn and a 5 mm hook, the finished square is about 5 inches across. Your square may be a little bigger or smaller depending on your yarn and how tightly you crochet, and that is perfectly fine as long as all your squares are made the same way.
Abbreviations (US Terms)
MR: magic ring
ch: chain
sl st: slip stitch
hdc: half double crochet
dc: double crochet
tr: treble crochet
st(s): stitch(es)
sp(s): space(s)
yo: yarn over
* *: repeat the instructions between the asterisks as directed
Special Stitches
Puff stitch: [Yo, insert your hook in the stitch, yo and pull up a loop] 3 times (7 loops on the hook). Yo and pull through all 7 loops, then ch 1 to close the puff. That little ch 1 also makes the space you will work into on the next round.
Beginning cluster: Ch 2, then [yo, insert your hook in the same space, yo and pull up a loop, yo and pull through 2 loops] twice. Yo and pull through all 3 loops on the hook.
Cluster (3 dc cluster): [Yo, insert your hook in the space, yo and pull up a loop, yo and pull through 2 loops] 3 times. Yo and pull through all 4 loops on the hook.
Pattern Notes
The square is worked in joined rounds with the right side facing you the whole time. You never turn your work.
Each round uses a new color. Fasten off at the end of every round and join the next color where the instructions say.
In Round 1 the beginning ch 3 counts as a double crochet. In Round 4 the beginning ch 4 counts as a treble crochet. In Rounds 2 and 3 the beginning chains do not count as stitches.
The numbers in parentheses at the end of each round tell you how many stitches or clusters you should have.
Sunburst Granny Square Pattern
Round 1 (Color A): Make a magic ring. Ch 3 (counts as the first dc), then work 15 dc into the ring. Pull the tail to close the ring and join with a sl st to the top of the beginning ch 3. Fasten off. (16 dc)
Round 2 (Color B): Join Color B with a sl st in any dc. Ch 2 (does not count as a stitch). Work a puff stitch in the same stitch and ch 1 to close it. *Puff stitch in the next dc, ch 1*. Repeat from * 14 more times. Join with a sl st to the top of the first puff. Fasten off. (16 puffs and 16 ch-1 spaces)
Round 3 (Color C): Join Color C with a sl st in any ch-1 space. Work a beginning cluster in the same space, then ch 2. *Cluster in the next ch-1 space, ch 2*. Repeat from * 14 more times. Join with a sl st to the top of the beginning cluster. Fasten off. (16 clusters and 16 ch-2 spaces)
Round 4 (Color D): Join Color D with a sl st in any ch-2 space. Ch 4 (counts as the first tr) and work 2 tr in the same space. 3 dc in the next space, 3 hdc in the next space, 3 dc in the next space. *(3 tr, ch 3, 3 tr) all in the next space to make a corner. 3 dc in the next space, 3 hdc in the next space, 3 dc in the next space*. Repeat from * 2 more times. Finish the last corner by working 3 tr in the very first space (where you started), then ch 3 and join with a sl st to the top of the beginning ch 4. (60 sts and 4 ch-3 corner spaces)
Finishing: Fasten off and weave in all your ends with the tapestry needle. If you are making several squares, give them a light steam or a gentle wet block so they lie flat and match in size before you join them.
How the Circle Becomes a Square
If you are wondering how sixteen round clusters turn into four straight sides, it is all in Round 4. Each side of the square uses four of the spaces from Round 3. The corner space gets the tallest stitches, the trebles. The spaces right next to the corners get double crochets, and the space in the middle of each side gets the shortest stitches, the half double crochets. Because the middle of each side sits farther out on the circle, the shorter stitches there fill in exactly the right amount, and the whole thing flattens into a square.
So if your square looks a little wavy, count your spaces in Round 4. You should have one corner space and then three side spaces before the next corner, all the way around.
Tips for a Tidy Square
Keep your puffs loose when you pull up the loops. If the loops are tight, it gets hard to pull through all 7 at the end.
Always join each new color in a different spot from the round before. That way the joins don’t stack up on one side of the square.
Weave in your ends as you go, or crochet over them in the next round. With four colors per square, the ends add up quickly!
If your square cups instead of lying flat, try going up one hook size for Round 4.
Joining Your Squares
There are lots of ways to join granny squares, and none of them is wrong. For a flat, almost invisible seam, hold two squares with the right sides facing up and whip stitch through the back loops of the matching stitches with your tapestry needle. For a seam you can see, hold the squares wrong sides together and single crochet through both layers. That little ridge looks lovely in a contrasting color.
VIDEO TUTORIAL
What Can You Make?
A handful of Sunburst Granny Squares makes a sweet pillow cover. Thirty or forty of them become a lap blanket, and you can keep adding squares until it is as big as you like. They are also lovely sewn together into a tote bag, or scattered on a vest with a solid color in between.
And there you have it, your very own Sunburst Granny Square! I hope the puffs and clusters felt a little easier with every repeat. Once your hands learn the rhythm of these four rounds, you will find yourself making just one more, and then another, and then another.
Keep your leftover yarn close by, because this pattern is perfect for using up small amounts of every color. Thank you for spending this time with me. Save this pattern for your next project, and come back soon to Grandma’s Crafts for more cozy ideas.