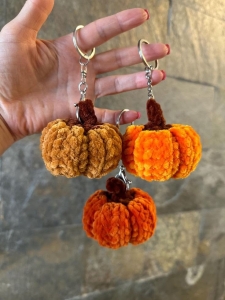
Welcome to our lovely blog Grandmas Crafts! We’re so happy you’re here. Today, we’re sharing a little fall inspiration: a crochet pumpkin with a tiny green leaf and a curly tendril. Whether you’d like to turn it into a keychain, add it to your favorite bag, or make a thoughtful gift for a friend, there’s plenty of room to have fun with the colors. Classic orange is always sweet, but cream, rust, or soft pink could be lovely too. Grab your favorite yarn, settle into your crochet corner, and join us! Below, you’ll find ideas and helpful tips for your pumpkin, followed by a separate step-by-step section to guide you through the project.
A tiny crochet pumpkin is one of those seasonal pieces you can enjoy beyond your fall display. Add it to your keys, clip it onto a bag, or tuck it into a gift, and it becomes a little handmade detail you can carry or share.
This pumpkin features a rounded body, defined ridges, and green details at the top. The curled tendril adds a playful finishing touch, while the small leaf brings a bit of contrast to the pumpkin’s shape.
Below, you’ll find ideas for choosing colors, preparing your supplies, and finishing your pumpkin for its intended use, followed by a separate section for the step-by-step instructions.
The Details That Give It Its Shape
The ridges are what make this little project recognizable. They divide the stuffed body into sections and create the familiar outline of a pumpkin.
At this scale, the finishing work matters. Evenly spaced ridges, a neatly attached stem, and tucked-away yarn ends can make the finished piece look more polished.
The leaf and tendril give you a few extra details to arrange before sewing. Taking a moment to check their placement lets you see how the whole pumpkin looks together.
Choosing Your Pumpkin Colors
Orange and green are a natural starting point, especially if you want a traditional fall look. A bright orange creates a cheerful pumpkin, while rust or burnt orange gives it a warmer, more muted appearance.
You can also move beyond the usual palette. Cream with sage green would suit a softer seasonal display. Mustard with olive could look lovely alongside earthy colors. Dusty pink or lavender would make a more playful bag charm.
If you’re making several pumpkins, try choosing one green yarn for all the leaves and stems, then changing the body color. That gives the group a consistent detail while allowing each pumpkin to look different.
For a gift, the recipient’s favorite color can be a good place to start. A pumpkin doesn’t have to be orange to feel like fall.
What to Prepare Before You Start
Gather your yarn, crochet hook, stuffing, yarn needle, scissors, and stitch marker before beginning. If you plan to make a keychain or bag charm, set aside the hardware too.
Smooth yarn can be helpful when working on a small project because it makes individual stitches easier to see. Choose a hook that produces a firm fabric, with stitches close enough to keep the stuffing inside.
Keep your orange and green yarns similar in thickness if you want the decorative details to stay in proportion with the body. Changing the yarn weight can change the finished size, so consider whether you want a tiny accessory or a larger decoration.
A stitch marker is especially useful for keeping track of rounds. Counting as you go is much easier than finding an extra or missing stitch after several more rounds.
A Few Things Beginners Should Know
Small crochet projects can require patience. The pieces may be compact, but working into small stitches and sewing tiny details can take concentration.
This pumpkin involves several common amigurumi skills: starting with a magic ring, working in rounds, increasing, decreasing, stuffing, and assembling separate parts.
Read through the instructions before you begin. Check that you understand each technique and look for any placement notes that need clarification. A beginner tutorial should clearly identify where every stitch goes, particularly in the leaf and finishing sections.
Give yourself time for the assembly. Crocheting the body is only part of the project; shaping the ridges and attaching the green details help create the finished look.
Step-by-Step Instructions
This small crochet pumpkin has a stuffed body, shaped ridges, a green leaf, and a curled tendril. Make each part separately, then sew the green details onto the pumpkin.
Finished Size
Using the suggested materials, the pumpkin measures approximately 2 cm (0.79 inch) tall and 4.5 cm (1.77 inches) wide.
Different yarn, hook sizes, and tension will affect the finished size.
Materials
1.75 mm crochet hook
Fiberfill stuffing
Yarn needle of your colors choice
Scissors
Stitch marker or a short piece of contrasting yarn
Use a hook that produces close, firm stitches so the stuffing does not show through the fabric. If you change yarn, adjust your hook size accordingly.
Crochet Terms
These instructions use US crochet terminology.
Term
What to do
ch — chain
Yarn over and pull through the loop on your hook.
sl st — slip stitch
Insert your hook into the indicated stitch, yarn over, and pull through both the stitch and the loop on your hook.
sc — single crochet
Insert your hook into the stitch, yarn over, and pull up a loop. Yarn over again and pull through both loops.
inc — increase
Work 2 single crochets into the same stitch.
dec — decrease
Combine 2 stitches into 1 single crochet.
MR — magic ring
An adjustable yarn loop into which you crochet the first round. Pull the yarn tail to close the center.
A number in brackets, such as [18], tells you how many stitches you should have at the end of that round.
How to Work a Decrease
Insert your hook into the next stitch, yarn over, and pull up a loop. Insert your hook into the following stitch, yarn over, and pull up another loop. Yarn over and pull through all 3 loops on your hook.
Keep Track of Your Rounds
Place a stitch marker in the first stitch of each round. Move it to the new first stitch when you begin the next round.
The body instructions do not include joins or turning chains. Use the marker to track the rounds as you continue around the piece.
Part 1: Make the Pumpkin Body
Use orange yarn.
Round 1: Begin the Center
Make a magic ring and crochet 6 single crochets into it.
Pull the starting tail to close the ring.
Stitch count: 6
Round 2: Increase in Every Stitch
Work 2 single crochets into each of the 6 stitches.
Stitch count: 12
Round 3
Repeat this sequence 6 times:
Work 1 single crochet in the next stitch.
Work 2 single crochets in the following stitch.
Stitch count: 18
Round 4
Repeat this sequence 6 times:
Work 1 single crochet in each of the next 2 stitches.
Work 2 single crochets in the following stitch.
Stitch count: 24
Round 5
Repeat this sequence 6 times:
Work 1 single crochet in each of the next 3 stitches.
Work 2 single crochets in the following stitch.
Stitch count: 30
Rounds 6–11: Build the Body
Work 1 single crochet in every stitch around.
Repeat for 6 complete rounds, keeping 30 stitches in each round.
Stitch count: 30 per round
At this stage, the piece should develop a rounded, cup-like shape.
Round 12: Begin Narrowing the Opening
Repeat this sequence 6 times:
Work 1 single crochet in each of the next 3 stitches.
Work 1 decrease over the following 2 stitches.
Stitch count: 24
Round 13
Repeat this sequence 6 times:
Work 1 single crochet in each of the next 2 stitches.
Work 1 decrease over the following 2 stitches.
Stitch count: 18
Add the Stuffing
Fill the pumpkin before continuing.
Add small amounts of stuffing at a time and distribute them evenly. Aim for a firm, rounded body without stretching the stitches enough to expose the filling.
Round 14
Repeat this sequence 6 times:
Work 1 single crochet in the next stitch.
Work 1 decrease over the following 2 stitches.
Stitch count: 12
Round 15
Work 6 decreases around the opening.
Stitch count: 6
Close the Opening
Cut the yarn, leaving approximately 80 cm (31.5 inches) for closing and shaping.
Pull the tail through the last loop on your hook, then thread it onto a yarn needle.
To close the remaining hole, pass the needle through the front loops of the final 6 stitches and pull gently until the opening closes. Keep the long tail attached for the next step.
Part 2: Shape the Pumpkin Ridges
The ridges are made by wrapping yarn around the outside of the stuffed body and passing the needle through its center.
Bring the long yarn tail around the outside of the pumpkin toward the center of the first round.
Insert the needle through that center.
Pass the needle through the stuffed body and bring it out at the center of the closed opening.
Pull gently. The outside strand should press into the body, creating a groove.
Move the next outside strand slightly around the pumpkin and repeat.
Continue until the body has approximately 7–8 sections.
Keep the sections reasonably even. Tighten each strand gradually so you can adjust the shape without pulling too hard.
Once you are happy with the ridges, secure the tail and hide the remaining yarn inside the pumpkin.
Part 3: Make the Leaf
Use green yarn.
The supplied leaf sequence contains unclear stitch placements. The steps below explain the stated sequence, but the uncertain placements need to be checked before this section can be treated as a complete beginner tutorial.
Chain 5.
Find the third chain from your hook. Do not count the loop on the hook as a chain.
Beginning there, work 2 single crochets, followed by a slip stitch.
Chain 1, then work a slip stitch into the “previous chain.” The supplied wording does not identify that chain precisely.
Continue along the unused side of the starting chain.
Work 2 single crochets, then chain 2 and make a slip stitch. The final slip-stitch placement is also unspecified.
Cut the yarn, leaving a long sewing tail, and fasten off.
Avoid guessing these placements if you are learning. They affect the leaf’s outline and need confirmation from a clear demonstration.
Part 4: Make the Stem and Curled Tendril
Use green yarn.
Make the Stem
Chain 7.
Insert your hook into the second chain from the hook.
Work 1 single crochet into each of the next 6 chains.
You should now have a short strip containing 6 single crochets.
Make the Tendril
Continue from the end of the stem:
Chain 12.
Starting in the second chain from the hook, work 1 slip stitch into each of the next 11 chains.
Gently twist this narrow section to encourage a curl.
Cut the yarn, leaving a long tail for attaching the piece. Pull the tail through the final loop to fasten off.
Part 5: Assemble the Pumpkin
Position the stem and tendril at the top of the pumpkin.
Use the green sewing tail to attach the base with several small stitches. Sew through the stem’s base and the pumpkin fabric, checking that the attachment feels secure.
Once the leaf’s construction has been confirmed and completed, position it beside the stem and sew it in place using its tail.
Secure the remaining ends and hide them inside the body.
Troubleshooting
Problem
What to check
Your stitch count is too high
Check whether you added an extra increase or worked twice into a stitch accidentally.
Your stitch count is too low
Look for skipped stitches or an extra decrease.
Stuffing shows through
Check your tension, hook size, and how firmly you packed the body.
The ridges look uneven
Adjust the spacing and tension of the shaping strands before securing the tail.
The stem feels loose
Add small sewing stitches around its base.
The tendril looks straight
Gently twist it into shape without stretching it.
Before adding keychain hardware: These instructions cover the crochet pumpkin only. A keychain attachment requires a separate, secure connection; the decorative leaf and tendril should not carry the weight.
Finishing It as a Keychain or Bag Charm
Once your pumpkin is assembled, decide how you’d like to use it.
For a keychain, choose hardware that suits the size of the finished piece. A bag charm may benefit from a clasp so you can move it between bags.
Plan a secure attachment to the pumpkin body. The leaf and curled tendril are decorative, so they should not support the weight of the accessory.
Before using it, check the connection with a gentle tug and inspect the sewn details. Make sure the yarn ends are secured and the hardware sits comfortably without pulling the pumpkin out of shape.
You can also leave the hardware off altogether. A miniature pumpkin can be tucked into a small seasonal arrangement or displayed with other handmade pieces.
Ideas for Giving Your Pumpkin
A little crochet pumpkin can add a personal touch to a fall gift. Attach it to a gift tag, package it with a handwritten card, or give it as a small accessory in colors chosen for the recipient.
Simple packaging works well. A plain backing card or small box keeps the focus on the crochet and protects the leaf and tendril.
If you know the yarn’s fiber content, include a brief care note. Removable hardware can also make the piece easier to care for, depending on the attachment you choose.
Caring for the Finished Piece
Follow the yarn label’s care instructions. For a pumpkin with metal hardware, consider whether the hardware should be removed before cleaning.
Avoid pulling on the leaf or tendril when handling the accessory. After cleaning, gently reshape the pumpkin and its decorative details, then allow it to dry fully.
If it travels with your keys or bag every day, occasionally check the attachment and sewing. A loose connection is easier to repair when you notice it early.
VIDEO TUTORIAL
Make It in a Color You’ll Enjoy
The color pairing is an easy way to give your pumpkin its own character. Traditional orange, soft cream, or an unexpected pastel can all work with the same familiar shape.
Choose your yarn with the finished use in mind, take your time with the small details, and give the assembly as much attention as the crochet. The result can be a seasonal accessory you’ll enjoy carrying, or a small handmade gift with a personal touch.