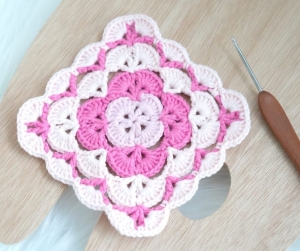
Welcome to our lovely blog, Grandmas Crafts! We’re happy you’re here to crochet with us. Today’s project is a shell stitch granny square, with little fans of double crochet that build outward from the center. The first few rounds need careful stitch placement, so we’ll explain where to insert your hook, how to recognize the corners, and how to make each join. Choose a smooth yarn, get comfortable, and work through the instructions one round at a time.
A Different Look for the Familiar Granny Square
Granny squares are a favorite for good reason. You can work on one small piece at a time, experiment with colors, and gradually build something larger.
The shell stitch version offers a different texture from the familiar groups of three double crochets. Its fans spread from a shared base, forming layers that give the square a decorative appearance.
The outer edge can be part of the design, too. Finishing after a shell round leaves a scalloped outline, which looks particularly pretty on a single-square project.
You might choose one color to emphasize the stitches or several shades to highlight the layers. Either approach gives you a chance to see the structure develop as you crochet.
Choosing Yarn That Shows the Stitches
For your first square, consider a smooth yarn that makes the stitches easy to see. Very fuzzy yarn can hide the spaces and stitch tops you need to identify while learning the construction.
A light or medium shade may also make counting easier. Cream, soft green, pale blue, or dusty pink would all give you a clear view of your work.
Use a hook suitable for your chosen yarn, then check the fabric as you go. You want stitches that feel comfortable to work and a square that can lie flat without being forced into shape.
There isn’t one fixed finished size for this project. The yarn, hook, tension, and number of rounds all contribute to the dimensions.
If you’re planning a larger project, make a sample square before deciding how much yarn to buy or how many squares to make.
Finding a Color Combination You Love
You don’t need a large palette to make the shell stitch interesting. Two colors can be enough to bring out the different layers.
Cream and sage would suit a softer look, while navy and pale blue could give the pattern more contrast. Rust with oatmeal might feel warm and earthy. Pink with burgundy could be a lovely choice if you enjoy richer shades.
Try laying the yarns beside each other before starting. Then work a sample to see how they look in the actual stitches, the proportions of each color can change the impression.
If you plan to repeat the same square, write down where you change colors. A simple note can save you from trying to reconstruct the sequence later.
Before You Begin the Tutorial
This square alternates between framework rounds and shell rounds. The framework creates spaces for the next layer, while the shell rounds fill those spaces with fans of double crochet.
The early rounds deserve a little extra attention. You’ll sometimes work into chain spaces and sometimes into stitches from an earlier round.
Read each round before beginning, and keep track of the four corners as the square grows. If a placement feels unclear, pause and check it before adding another layer.
Beginners may find it helpful to make the first square in one color. Once the construction feels familiar, you can experiment with color changes.
Complete Shell Stitch Granny Square Tutorial
The tutorial below uses US crochet terminology and covers the materials, abbreviations, stitch placement, individual rounds, repeating rounds, and finishing.
Materials
Smooth yarn in one or more colors
Crochet hook suitable for your yarn
Scissors
Yarn needle
Optional stitch markers
The finished size depends on your yarn, hook, tension, and number of rounds.
Abbreviations — US Crochet Terms
Abbreviation
Meaning
ch
Chain
st
Stitch
sp
Space
ch-1 sp
Chain-1 space
ch-3 sp
Chain-3 space
ch-5 sp
Chain-5 space
sc
Single crochet
dc
Double crochet
sl st
Slip stitch
Shell: Work 7 dc into the same space.
Center of a shell: The fourth dc in a group of 7 dc.
Repeat: When instructions say to repeat a sequence 4 times, work that sequence 4 times total.
Basic Stitches
Single Crochet — sc
Insert your hook into the indicated stitch or space. Yarn over and pull up a loop. Yarn over again and pull through both loops on your hook.
Double Crochet — dc
Yarn over, insert your hook into the indicated stitch or space, yarn over, and pull up a loop. Yarn over and pull through 2 loops. Yarn over again and pull through the remaining 2 loops.
Slip Stitch — sl st
Insert your hook into the indicated stitch, yarn over, and pull through both the stitch and the loop on your hook.
Working Into a Chain Space
Insert your hook under the chain or chain arch, rather than into an individual chain stitch.
Working Into the Top of a Stitch
Insert your hook under the two top loops, which form a small V.
Understand the Round Structure
The square alternates between two types of rounds:
Framework rounds create the chain spaces that support the next layer of shells.
Shell rounds fill those spaces with groups of 7 dc.
Each additional layer of shells requires two rounds.
Do not turn between rounds. Read each round before starting, especially when the instructions refer to stitches from an earlier round.
Round 1: Make the Center
Make a magic ring.
Ch 4. The first 3 chains count as 1 dc; the fourth chain creates a ch-1 space.
Work 1 dc into the magic ring, then ch 1.
Repeat Step 3 7 times total.
Pull the yarn tail to tighten the magic ring.
Join with a sl st into the third chain of the beginning ch 4.
Check Your Work
You should have:
8 dc, counting the beginning ch 3 as one dc.
8 ch-1 spaces.
Do not add 8 single crochets to the magic ring before beginning. The dc and chains described above form the first round.
Round 2: Make Four Shells
Ch 1. This does not count as an sc.
Work 1 sc into the next ch-1 space.
Work 7 dc into the following ch-1 space.
Repeat Steps 2–3 4 times total.
Join with a sl st into the first sc.
Work only into the ch-1 spaces from Round 1.
Check Your Work
You should have:
4 shells, each containing 7 dc.
4 sc, with one between each pair of shells.
Round 3: Create the First Corner Framework
This round uses the 4 sc from Round 2 as its anchor points. Each one receives a corner group.
First Corner
Ch 4. This counts as 1 dc and ch 1.
Into the same sc where you joined Round 2, work: 1 dc, ch 3, 1 dc, ch 1, 1 dc.
Ch 5 to bridge over the next shell.
The complete first corner, including the starting chains, has:
1 dc, ch 1, 1 dc, ch 3, 1 dc, ch 1, 1 dc.
Second and Third Corners
Into each of the next 2 sc, work:
1 dc, ch 1, 1 dc, ch 3, 1 dc, ch 1, 1 dc, ch 5.
Fourth Corner
Into the final sc, work:
1 dc, ch 1, 1 dc, ch 3, 1 dc, ch 1, 1 dc.
Then:
Ch 2, instead of ch 5.
Work 1 dc into the second chain of the beginning ch 4 to join.
Count that second chain upward from the base of the beginning chain.
Why This Join Is Different
The final ch 2 and dc replace the last ch-5 bridge. This positions your hook above the center of a shell for the next round.
Do not add a slip stitch after this joining dc.
Check Your Work
You should have:
4 corner groups.
4 ch-3 corner spaces.
8 ch-1 spaces, with two in each corner group.
3 ch-5 bridges, plus the final bridge formed by ch 2 and dc.
Round 4: Add Eight Shells
This round uses two different stitch locations:
Chain spaces from Round 3.
The center dc of the shells from Round 2.
Begin the Round
Ch 1.
Find the fourth dc of the Round 2 shell directly below your hook.
Work 1 sc into the top of that dc, enclosing the post of the dc that joined Round 3.
The joining post should be held inside this sc.
Work Around the Square
Repeat this sequence 4 times total:
Work 7 dc into the next ch-1 space.
Work 1 sc into the ch-3 corner space.
Work 7 dc into the next ch-1 space.
Work 1 sc into the fourth dc of the next Round 2 shell, enclosing the ch-5 bridge from Round 3.
On the fourth repeat, omit Step 4. The sc made at the beginning of the round already anchors that shell.
Join with a sl st into the beginning ch 1.
How to Enclose a Chain Bridge
Hold the ch-5 bridge above the center stitch of the shell. Insert your hook into that center stitch so the bridge is caught inside the sc as you complete it.
You are anchoring the bridge to the shell beneath, rather than working an sc only around the bridge.
Check Your Work
You should have:
8 shells, each containing 7 dc.
4 corner sc.
4 sc anchoring the bridges to the previous shells.
8 sc total.
Pattern clarification: The supplied text mentions a “ch-4 space” for the first shell of this round, but Round 3 does not create a separate ch-4 space. These instructions use the corresponding ch-1 space beside the first corner. This placement should be checked against the tutorial images.
Round 5: Create the Next Framework
This round alternates between side groups and corner groups, all worked into sc from Round 4.
First Side Group
Ch 4, counting as 1 dc and ch 1.
Work 1 dc into the first sc of Round 4.
Ch 5.
Repeat Around the Square
Repeat the following pair of groups 3 times total:
Into the next sc, work a corner group:
1 dc, ch 1, 1 dc, ch 3, 1 dc, ch 1, 1 dc, ch 5.
Into the following sc, work a side group:
1 dc, ch 1, 1 dc, ch 5.
Final Corner
Into the final sc, work:
1 dc, ch 1, 1 dc, ch 3, 1 dc, ch 1, 1 dc.
Finish with:
Ch 2, then 1 dc into the second chain of the beginning ch 4.
Do not add ch 5 or a slip stitch at this final join.
Check Your Work
You should have:
4 corner groups, each with a ch-3 space.
4 side groups.
12 ch-1 spaces total.
Round 6: Add Twelve Shells
Ch 1.
Work 1 sc into the fourth dc of the Round 4 shell below your hook, enclosing the joining dc from Round 5.
Continue around the square, following the framework:
Work 7 dc into each ch-1 space.
Work 1 sc into each ch-3 corner space.
At each ch-5 bridge, work 1 sc into the fourth dc of the shell beneath, enclosing that bridge.
Stop when you return to the beginning. Do not work a second sc into the starting shell center.
Join with a sl st into the beginning ch 1.
Check Your Work
You should have:
12 shells.
12 sc total: 4 at the corners and 8 anchoring the bridges.
Round 7: Create a Larger Framework
Use the sc from Round 6 as your anchor points.
Begin
Ch 4, counting as 1 dc and ch 1.
Work 1 dc into the first sc.
Ch 5.
At Each Side sc
Work:
1 dc, ch 1, 1 dc, ch 5.
These sc stitches sit in the deeper dips between neighboring shells.
At Each Corner sc
Work:
1 dc, ch 1, 1 dc, ch 3, 1 dc, ch 1, 1 dc, ch 5.
These sc stitches sit in the shallower dip between the two shells surrounding a corner.
Finish
At the final group, replace its ending ch 5 with:
Ch 2, then 1 dc into the second chain of the beginning ch 4.
Check Your Work
You should have:
4 corner groups.
8 side groups.
16 ch-1 spaces ready for the next shell round.
Round 8 and Beyond
Continue alternating the two round types until the square reaches your desired size.
Even-Numbered Rounds: Shell Rounds
Follow the method used in Round 6:
Ch 1.
Anchor the joining dc to the center of the shell below with an sc.
Work 7 dc into every ch-1 space.
Work sc into each ch-3 corner space.
Anchor each ch-5 bridge to the fourth dc of the shell below.
Join into the beginning ch 1.
Odd-Numbered Rounds: Framework Rounds
Follow the method used in Round 7:
Begin with ch 4, dc into the first sc, and ch 5.
Work side groups into side sc stitches.
Work corner groups into the four corner sc stitches.
Replace the final ch 5 with ch 2 and the joining dc.
Shell Counts
Each successive shell round adds 4 shells.
Shell round
Number of shells
Round 2
4
Round 4
8
Round 6
12
Round 8
16
Round 10
20
Round 12
24
Keep measuring your work. A particular round number does not guarantee a fixed size.
When to Stop
For a Scalloped Edge
Finish after an even-numbered shell round. The outer shells create the scalloped outline.
For an Additional Border
You may finish after an odd-numbered framework round if your chosen border is designed to use that foundation.
For Multiple Joined Squares
Plan your joining method before completing each square.
For the join-as-you-go approach described with this pattern, leave the final round unfinished until you are ready to connect the square to its neighbors. The connections are made while crocheting that round.
Joining is a separate technique from making the square. The demonstration supplied with the text is available here:
Color Changes
Broad Layers of Color
Use one color for a framework round and its following shell round.
For example:
Rounds 1–2: Color A.
Rounds 3–4: Color B.
Rounds 5–6: Color C.
This keeps each layer of shells visually distinct.
Contrasting Framework
Use a darker color for the framework rounds and lighter colors for the shell rounds.
This emphasizes the lines between the shells and creates a more detailed appearance.
If changing yarn at a framework-round join, introducing the next color on the final pull-through of the joining dc lets you begin the next round with the new color.
Finishing
Complete the final join.
Cut the yarn, leaving enough tail to weave in securely.
Pull the tail through the loop on your hook.
Thread the tail onto a yarn needle.
Weave it through the fabric without pulling the square out of shape.
Secure the starting tail and any color-change ends.
Lay the square flat and inspect the corners and shells. If blocking is needed, use a method suitable for your yarn and gently shape the square without overstretching the scallops.
Troubleshooting
Problem
What to check
A shell looks too small or too large
It should contain exactly 7 dc.
You cannot find the middle of a shell
Count to its fourth dc.
A chain bridge hangs loose
Check that the anchoring sc encloses it.
Your next round begins in the wrong position
Check the framework round’s ch-2-and-dc join.
A corner is missing or looks uneven
Check for four corner groups, each containing ch 3.
There are too many shells
Check that shells were worked only into ch-1 spaces.
The square curls or ruffles
Verify counts and stitch placement first, then consider tension and hook size.
The first square is an opportunity to learn the structure. Once you can recognize the shell centers, side groups, and corner groups, the repeating rounds become easier to follow.
What Could You Make With Your Squares?
Once you’ve made a practice square, you can decide how you’d like to use the design.
A cushion cover could be a manageable next project, with enough repetition to become familiar with the pattern. Choose colors that fit your room, or let the crochet introduce a little color of its own.
A blanket gives you more room to explore. You could repeat one palette throughout or use a shared background shade to bring several combinations together.
You can also keep growing one square rather than making separate motifs. Measure it regularly and decide where you want to stop based on the intended project.
Before making a collection of squares, think about how you’ll join them. The final round and edge shape affect the joining process, so it helps to plan that part early.
Keeping Multiple Squares Consistent
If you’re making several motifs, keep a small record of your yarn, hook size, color sequence, and number of rounds.
Lay completed squares beside each other occasionally to compare their dimensions. This can help you notice a change in tension before you’ve made many pieces.
Try to finish each square at the same point in the repeat. Consistent finishing makes it easier to arrange the motifs and follow your chosen joining method.
It’s also worth checking the squares in different layouts before connecting them. Take a photograph of the arrangement you like so you can refer to it while joining.
Give the Finishing Work Some Attention
Neatly woven ends help the finished piece feel complete. Take care around color changes and avoid pulling the fabric out of shape as you secure the tails.
Lay the work flat to inspect the corners and scallops. If you choose to block it, use a method appropriate for the yarn’s fiber content and shape it gently.
For washing and drying, follow the yarn label. If your project contains different yarns, consider the care requirements of all of them.
VIDEO TUTORIAL
Enjoy the First Square Before Planning the Whole Project
There’s no need to decide on a full blanket before you’ve tried the design. Make one square, look at the colors and texture, and see what it inspires you to do next.
You might want to repeat the same combination, try a different palette, or continue growing that first square. Give yourself room to enjoy the process.
We’d love to hear what you’re planning: a soft, neutral square, something bright and colorful, or a larger project made one motif at a time?