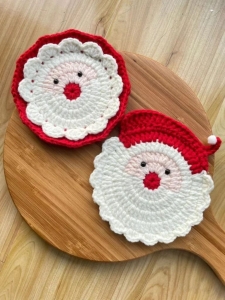
Welcome to Grandma’s Crafts! I’m so happy you are here today. This Santa Coaster Crochet Pattern brings together a round face, a little red hat, and a scalloped white beard. We will work on one section at a time, with stitch counts to help you check your progress along the way.
I love a small Christmas project that gives us room to practice without managing a large piece of fabric. Here you can work on joined rounds, simple decreases, and a shell edging. If any of those techniques are new to you, read the explanations below before picking up your hook.
This version has a plain skin-tone center and an upright triangular hat. The hat grows directly from the circle, so there is no separate triangle to sew in place. A narrow white strip covers the base of the hat, and embroidered details give Santa his expression.
Set out your colors and keep two removable markers nearby. We will use them to separate the hat section from the beard section. Before starting a whole set, finish one coaster and check how it sits beneath your favorite mug.
A Little Christmas Detail for Your Table
Use the coaster beneath a cup, with the cup resting on the circular center rather than the hat. Keep the face details flat so the base of the cup has a level place to sit. The hat can extend beyond the cup as a decorative detail.
You can also tuck one into a gift with a mug, or use it as a small table decoration. For a matching set, keep the yarn weight and hook consistent. A different skin-tone shade can change the look without changing any stitch counts.
Skill Level and Finished Size
This is a beginner practice project for someone who can already make chain stitches, single crochet, double crochet, and slip stitches. You will also learn a single crochet decrease and a five-stitch shell. Work slowly through the first example of each technique.
There is no fixed gauge or finished measurement for this adaptation. Make the circular base, lay your mug on it, and measure the result. If the center is too small, restart with a slightly heavier yarn and a suitable hook. Adding rounds would change the hat and beard placement, so keep the five-round structure for this version.
Gather Your Supplies
Use smooth cotton yarn in skin tone, red, and white, plus a small amount of black yarn or embroidery thread for the eyes. Choose one yarn weight for all three main colors and a hook recommended on its label. You will also need scissors, a tapestry needle, two removable stitch markers, and a ruler. Yarn quantity depends on your chosen yarn and tension; use the first completed sample to judge what you need for a set.
Abbreviations (US Terms)
ch = chain; sc = single crochet; dc = double crochet; sl st = slip stitch; st(s) = stitch(es); sc2tog = single crochet two stitches together. An increase in this pattern means working 2 dc into one stitch. Numbers in parentheses are the completed stitch counts.
Three Techniques to Read First
Magic ring: form a loop with the yarn tail crossing over the working yarn. Insert your hook through the loop, draw up the working yarn, and make a chain to secure it. Work the round into the loop, around both the loop and the tail. Pull the tail to close the center, then secure it when weaving in the ends.
Single crochet decrease, sc2tog: insert your hook into the next stitch and pull up a loop. Insert it into the following stitch and pull up another loop. Yarn over and draw through all three loops. You have used two stitches from the previous row and made one new stitch.
Beard shell: work 5 dc into one stitch. All five stitches share the same insertion point. The stitches skipped on either side give the shell room to spread; do not add chains between the stitches.
Pattern Notes
The face is worked in joined rounds without turning. At the beginning of each face round, ch 2; these chains never count as a stitch. Work the first dc into the same stitch as the join, and join to the first actual dc, not to the chain. Mark that first dc if you find the join difficult to identify.
The hat and white brim are worked in rows. Ch 1 at the start of each row; this chain does not count as a stitch. Work the first stitch into the first actual stitch of the previous row, and work through both top loops unless instructed otherwise. Turn only where the instructions say to turn.
Santa Coaster Crochet Pattern
Step 1: Make the Face
Round 1: With skin-tone yarn, make a magic ring. Ch 2, work 12 dc into the ring, tighten the center, and join with a sl st to the first dc. Do not turn. (12 dc)
Round 2: Ch 2. Work 2 dc into each stitch around, starting in the stitch containing the join. Join to the first dc. Do not turn. (24 dc)
Round 3: Ch 2. Repeat [2 dc in the next stitch, 1 dc in the next stitch] 12 times. Join to the first dc. Do not turn. (36 dc)
Round 4: Ch 2. Repeat [2 dc in the next stitch, 1 dc in each of the next 2 stitches] 12 times. Join to the first dc. Do not turn. (48 dc)
Round 5: Ch 2. Repeat [2 dc in the next stitch, 1 dc in each of the next 3 stitches] 12 times. Join to the first dc. Fasten off. (60 dc)
Lay the circle with its right side facing you and the final join at the upper edge. Starting at the first dc of Round 5, count in the direction the round was worked. Mark stitch 1 and stitch 20. The 20 stitches between and including these markers form the hat base; stitches 21 through 60 remain for the beard.
Step 2: Shape the Red Hat
Row 1: With the right side of the face toward you, attach red yarn to marked stitch 1 with a sl st. Ch 1. Work 1 sc into that same stitch and 1 sc into each of the next 19 stitches, ending in marked stitch 20. Leave the remaining 40 face stitches unworked. Turn. (20 sc)
Row 2: Ch 1. Sc2tog over the first 2 stitches, work 1 sc into each of the next 16 stitches, and sc2tog over the last 2 stitches. Turn. (18 sc)
Row 3: Ch 1. Sc2tog, sc in each of the next 14 stitches, sc2tog. Turn. (16 sc)
Row 4: Ch 1. Sc2tog, sc in each of the next 12 stitches, sc2tog. Turn. (14 sc)
Row 5: Ch 1. Sc2tog, sc in each of the next 10 stitches, sc2tog. Turn. (12 sc)
Row 6: Ch 1. Sc2tog, sc in each of the next 8 stitches, sc2tog. Turn. (10 sc)
Row 7: Ch 1. Sc2tog, sc in each of the next 6 stitches, sc2tog. Turn. (8 sc)
Row 8: Ch 1. Sc2tog, sc in each of the next 4 stitches, sc2tog. Turn. (6 sc)
Row 9: Ch 1. Sc2tog, sc in each of the next 2 stitches, sc2tog. Turn. (4 sc)
Row 10: Ch 1. Sc2tog twice. Turn. (2 sc)
Row 11: Ch 1. Sc2tog once. Fasten off. (1 sc)
Each decrease row removes two stitches until the last row, which combines the final pair. Keep your turning chain loose enough to reach the first stitch. Do not work into it at the end of the next row.
Step 3: Add the White Hat Brim
Brim Row 1: With white yarn, ch 21. Starting in the second chain from the hook, work 1 sc into each chain across. Turn. (20 sc)
Brim Row 2: Ch 1. Work 1 sc into each stitch across. Fasten off, leaving a tail long enough to sew both long edges of the strip. (20 sc)
Center the strip over the line where the red hat meets the face. Match its 20 stitch columns to the 20 hat-base stitches. Sew the upper and lower edges in place with small stitches, following the curve of the base. Check that the face stays flat before tightening the sewing yarn.
Step 4: Work the Scalloped Beard
With the right side facing you, attach white yarn with a sl st to face stitch 20, just below the end of the hat base. The attachment stitch is an anchor only. Do not work a shell into it.
Repeat [skip the next face stitch, work 5 dc into the following face stitch, skip the next face stitch, sl st into the following face stitch] 10 times. Work only into the 40 unused stitches of Round 5, beginning with stitch 21 and ending with stitch 60. (10 shells, 50 dc and 10 sl sts)
To check the first repeat: skip stitch 21, work the shell into stitch 22, skip stitch 23, and sl st into stitch 24. The last repeat uses stitches 57 through 60. Finish by making a sl st into face stitch 1 at the other end of the hat base. Fasten off. The final anchor slip stitch is not included in the edging count.
Step 5: Give Santa His Expression
Before embroidering, place your mug on the center and check where its base rests. Use flat embroidery for the face so there are no raised beads or buttons beneath the cup. Remove the mug before sewing.
With black yarn or thread, sew two short horizontal eye stitches in the skin-tone area beneath the brim, one on each side of the center line. With red yarn, sew one small horizontal nose stitch below and between the eyes. Take the needle through the fabric without pulling tightly, secure the tails on the back, and weave them into several neighboring stitches.
Finishing and Small Adjustments
Weave in every remaining tail, taking particular care with the magic-ring tail. Remove the markers. If your yarn label permits wet blocking, dampen the piece, lay it flat, and gently arrange the hat and shells. Let it dry completely before placing a cup on it.
Check the face before making another coaster. If it cups, recount each round and look for a missed increase. If it ruffles, look for an extra increase. Even with correct counts, yarn and tension can affect flatness; try another hook on a fresh sample if gentle blocking does not help.
VIDEO TUTORIAL
Before You Put Your Hook Away
I would start with one Santa and give the finishing a little attention. Count the hat rows, spread out the beard shells, and check the brim before securing the last tails. Those small checks are easier on a single piece than on a whole stack waiting to be finished.
Once you like your sample, write down the yarn and hook you used. Keep that note with the coaster so your next one has the same proportions. You can change the colors while keeping the construction and counts exactly the same.
Thank you for spending a little crochet time with me at Grandma’s Crafts. I hope you enjoy giving this Santa his own expression and finding a place for him on your Christmas table. Come back whenever you are ready for another project, dear.