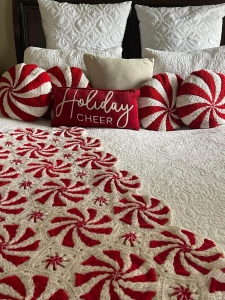
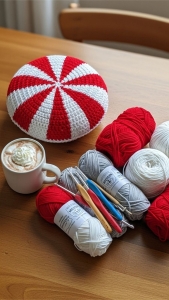
Welcome to Grandma’s Crafts! Few color combinations feel as cheerful at Christmas as red and white, and this Peppermint Throw and Pillow turns them into a striking swirl of handmade texture. Designed by Bendy Carter, the matching pieces bring the familiar look of peppermint sweets to a sofa, reading chair, or festive sitting room.
This is a project to enjoy over several craft sessions. The throw grows from individual motifs, while the round pillow offers a companion piece with the same eye-catching design. Whether you choose one or plan the full set, the original PDF is your guide to the interlocking technique and the carefully arranged finishing details.
Understand the Project Before Choosing Your Yarn
The throw measures approximately 47 inches wide by 55 inches long (119.5 by 139.5 cm). The pillow measures 16 inches (40.5 cm) in diameter. These are the sample dimensions, and matching the motif gauge helps you work toward them.
The original pattern is rated Experienced. Although it uses familiar crochet stitches, the interlocking construction asks you to pay close attention to where the hook goes and which color’s previous round you are working into. It should not be mistaken for a simple striped granny-square blanket.
The throw uses 42 large motifs and 30 small filler motifs. There are six different large-motif edging versions, with specific quantities and locations. Those variations give the assembled piece its intended outline, so the diagram in the PDF is especially useful.
Materials Listed in the PDF
The source lists Red Heart Soft: 10 balls White (4600), color A, and 6 balls Really Red (9925), color B. The listed solid-color balls contain 5 oz (141 g) and 256 yards (234 m) each. Keep the original combined supply list as your reference; the PDF does not provide a separate shopping allocation for making only the pillow versus only the throw.
Use a 5.5 mm crochet hook, US I/9, or the size needed to match the motif gauge. You will also need a yarn needle and, for the pillow, a 16-inch round pillow form. A locking stitch marker is listed as optional and is particularly helpful for holding an inactive working loop.
If you substitute yarn, check its yardage and thickness carefully. Sixteen balls of a different yarn do not necessarily contain the same total length as sixteen balls of the original. Buy with the complete project in mind and keep the ball bands until you have finished.
A Closer Look at Interlocking Crochet
In this design, each new round is worked in front of the previous round, but the stitches connect to earlier stitches of the same color. The hook passes through the other color’s chain spaces rather than simply crocheting into the immediately preceding round.
That placement produces the peppermint effect. White rounds connect to white, and red rounds connect to red. The PDF explains how to bring the inactive loop and working yarn forward at the appropriate moments, an important detail for keeping the two colors arranged correctly.
Before committing to all of the motifs, make one practice motif and read the interlocking notes closely. A locking marker can keep the dropped loop secure while the other color is active. Leave enough room in the loop to retrieve it comfortably, without letting it unravel.
Download the Free Pattern PDF
Keep the original pattern nearby for the complete stitch instructions, counts, and finishing directions. The notes below help you plan your project and choose materials.
The source gives motif measurements rather than a standard row-and-stitch swatch: one small motif is 3 1/2 inches (9 cm), and one large motif is 7 3/4 inches (19.5 cm). Measure your practice pieces before making the full set.
If the motifs are consistently larger or smaller, the throw’s dimensions and pillow fit will change. Adjust your hook and make another sample rather than hoping that assembly will correct the difference. A pillow form is much less forgiving than a loose throw when it comes to size.
Label every large motif with its edging number as soon as it is finished. The pattern itself recommends this. Small paper tags or separate labeled bags can help you keep the versions organized, and a checklist makes it easy to track the remaining quantities.
Color Ideas and Decorating Possibilities
The original red-and-white palette makes an unmistakable Christmas statement. Let the throw be the main colorful piece on a neutral sofa, or place the pillow on a chair where its circular shape can be seen clearly. A few simple decorations nearby may be all the room needs.
For a softer seasonal look, consider burgundy with cream or forest green with ivory. A bright pink-and-white combination could bring a candy-shop feel to the same design. Preserve strong contrast between the colors so the interlocking shapes remain easy to read.
Changing colors is different from resizing the pattern. If you would like a different throw size, remember that the edging types and filler motifs are planned around a particular assembly. Simply leaving out a few circles can affect the outside shape and joining layout.
Assembly and Finishing Tips
Lay out the motifs before sewing and compare their positions with the PDF’s assembly diagram. This gives you a chance to check the edging numbers and the direction of the rounded outside edges while everything is still easy to move.
Use the long tails left for sewing where the pattern calls for them, and keep your seam tension even. Pulling the joins too tightly can distort the motifs. Step back from the layout occasionally to look for a misplaced piece before you commit more seams.
The pillow is worked as a single construction with increasing and decreasing sections, and the form is inserted before the final rounds. Read that part ahead of time so the insert is nearby when you need it. The PDF also includes finishing details that help complete the peppermint appearance.
Make It a Project You Can Enjoy
Divide the work into manageable stages: practice, large motifs, filler motifs, layout, and finishing. Making a few motifs at a time can feel more approachable than looking at the entire supply pile and all seventy-two pieces at once.
Store finished motifs flat and together so they stay organized. Follow the care instructions for your chosen yarn and the pillow insert; their requirements may differ. For the sewn pillow construction, check how you intend to clean the complete item before inserting the form.
This set rewards patient work with a distinctive holiday look. It can be a special addition to your own home or a generous handmade gift for someone who loves a cheerful Christmas room.
VIDEO TUTORIAL
Save the Pattern for Your Next Craft Session
Ready to make your own? Download the PDF below and read through the original directions before you begin. You can print it or keep it open beside your work so the pattern is easy to follow.
Pattern credit: Peppermint Throw and Pillow by Bendy Carter for Red Heart/Coats & Clark, pattern RHC0538-019044M. Consult the original PDF for all motif variants, interlocking instructions, and assembly diagrams.