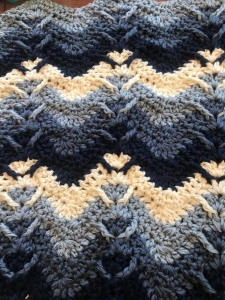
If you haven’t made a double crochet decrease before, practice over two stitches on your swatch. Start a double crochet in the first stitch and stop before the last pull-through. Do the same in the next stitch. Yarn over and draw through all the loops that remain to join the two stitches at the top. When you move on to the blanket, check how many stitches the pattern tells you to join at each edge and valley.
Practice the Raised Stitch
The ridges around the peaks are made with front post treble crochet. The post is the upright part of a stitch. Your hook goes around that upright part, leaving the top loops untouched.
To practice, wrap the yarn around your hook twice. Insert the hook from the front, pass it behind the post, and bring it back out to the front on the other side. Yarn over and pull up a loop. Yarn over and pull through two loops three times to finish the treble.
In the blanket, the post stitches wrap around stitches two rows below the row you’re making. Before you pull up a loop, pause and count down from your working row. A marker in the peak’s chain space can help you find the stitches on either side.
Dear friends of Grandma’s Crafts, let’s make a blanket that brings a little of the woodland indoors. We’ll start with a small swatch so you can see how the peaks and valleys form. Once you can spot the middle stitch at the top of a peak, you’ll know where to place your next increase. That little detail makes the whole pattern easier to follow.
This beginner adaptation takes its color inspiration from the Mountain Forests Afghan by Christine Grazioso-Moody. Use the stitch counts below when making this version.
Materials
-
Medium weight, No. 4 yarn in six shades: A charcoal, B dark sage, C medium sage, D light sage, E frosty green, and F cream.
-
A 10 mm crochet hook as a starting point. Adjust if the fabric feels stiff or too loose.
-
Removable stitch markers, scissors, a yarn needle, and a measuring tape.
Hold two strands of the same color together throughout. Pull one strand from each of two balls, or divide a single skein into two balls if needed. Treat the two strands as one and catch both on every pull-through.
The full throw starts with 129 chains and has 50 rows. The finished size and yarn quantities depend on your swatch. Measure the swatch relaxed and laid flat before buying yarn for a specific size.
US Crochet Terms
| Abbreviation |
Meaning |
| ch |
Chain |
| dc |
Double crochet |
| dc2tog |
Join the next 2 stitches into 1 double crochet decrease |
| dc3tog |
Join the next 3 stitches into 1 double crochet decrease |
| FPdc |
Front post double crochet |
| st |
Stitch |
| yo |
Yarn over |
How to make a double crochet decrease: Yo, insert the hook into the next stitch, yo and pull up a loop, then yo and pull through two loops. Stop there. Repeat in the next stitch for dc2tog, or in each of the next two stitches for dc3tog. To finish, yo and pull through every loop left on the hook. The completed decrease counts as one stitch.
How to make a front post double crochet: Yo, then pass the hook from front to back and back to front around the upright post of the indicated stitch in the previous row. Yo and draw up a loop around the post. Finish like a regular dc: yo and pull through two loops, then yo and pull through the final two. Once you’ve worked around the post, move on to the next stitch. Leave the top loops of the stitch you just worked around empty.
How to mark a peak: At each peak, you’ll work 3 dc into one stitch. Clip a marker into the middle dc of that group. On the next row, that’s the stitch where all three new peak stitches go.
First, Make a Practice Swatch
Chain 21 and make the three rows below with one peak. Follow the opening and closing decreases, but skip the valley repeat because there’s no next peak on the swatch. You’ll have 19 stitches in every row.
One little swatch is enough to practice the corners, the peak, and the two raised stitches. If you’d like to practice an inside valley too, start with 39 chains for two peaks and follow the valley repeat once. That swatch has 37 stitches in every row.
Row 1: Build the First Ripples
With two strands of Color A, loosely ch 129 for the full blanket. The loop on your hook doesn’t count as a chain.
-
Make dc2tog over the third and fourth chains from the hook. The two skipped chains do not count as a stitch.
-
Work 1 dc in each of the next 7 chains.
-
Work 3 dc in the next chain to make the first peak. Mark the middle dc.
-
Work 1 dc in each of the next 7 chains.
-
For each remaining peak, work this sequence: dc3tog over the next 3 chains, dc in each of the next 7 chains, 3 dc in the next chain, then dc in each of the next 7 chains. Repeat this sequence 6 times for the full blanket. Mark the middle dc of every peak as you go.
-
Make dc2tog over the last 2 chains. Turn.
Check your work: You should have 127 stitches, 7 peaks, and 6 inside valleys. If you’re one chain short or long, check whether you worked seven separate dc on both sides of each peak.
Row 2: Keep the Ripple in Shape
Stay with Color A for this row. From here on, ch 2 at the beginning of every row for turning height. It does not count as a stitch. Work the opening decrease into the first two actual stitches.
-
Ch 2, then dc2tog over the first 2 stitches.
-
Work 1 dc in each of the next 7 stitches.
-
Work 3 dc in the marked peak stitch. Move the marker into the middle dc of the new group.
-
Work 1 dc in each of the next 7 stitches.
-
Repeat this sequence 6 times: dc3tog over the next 3 stitches, dc in each of the next 7 stitches, 3 dc in the next marked peak stitch, then dc in each of the next 7 stitches. Move each marker up when you make the new peak.
-
Make dc2tog over the last 2 actual stitches. Leave the turning chains unworked. Turn.
Stitch count: 127. Marking the first and last stitches can help you find the edges when you turn.
Row 3: Add the Raised Stitches
Change to Color B. This row keeps the same peaks and valleys. The difference is that two regular double crochets beside each peak become front post double crochets.
-
Ch 2, then dc2tog over the first 2 stitches.
-
Work 1 dc in each of the next 6 stitches, then 1 FPdc around the post of the next stitch.
-
Work 3 dc in the marked peak stitch and move the marker up to the middle dc.
-
Work 1 FPdc around the post of the next stitch, then 1 dc in each of the next 6 stitches.
-
For each of the remaining peaks, work dc3tog over the next 3 stitches, then repeat Steps 2 through 4. Do this 6 times for the full blanket.
-
Make dc2tog over the last 2 stitches. Turn.
Stitch count: 127. Each FPdc takes the place of one regular dc, so the total stays the same. If you count 128 or more, check that you didn’t make an extra dc in the top of a stitch after working around its post.
Rows 4 Through 50: Repeat and Change Colors
Work Row 4 like Row 2, staying with Color B. From there, repeat Row 3, then Row 2 for each new stripe. Change colors at the end of every even row except the last. To change colors, pull the two strands of the new shade through the final loops of the last stitch, then turn and begin the next row.
| Rows |
Colors, in order |
| 1 through 12 |
A, B, C, D, E, F |
| 13 through 24 |
A, B, C, D, E, F |
| 25 through 36 |
A, B, C, D, E, F |
| 37 through 48 |
A, B, C, D, E, F |
| 49 and 50 |
A |
Each letter represents two rows. The first stripe uses Rows 1 and 2 to set up the blanket. Every stripe after that starts with the raised row and ends with the plain ripple row.
If you’d rather make a shorter throw, stop after any plain ripple row. For a wider blanket, add 18 foundation chains for each extra peak and work one more valley-and-peak repeat in each row.
Finish Your Woodland Blanket
After your last row, cut both strands and pull them through the final loop. Use a yarn needle to weave the tails securely into matching areas of the fabric. If the double strand makes a bulky spot, weave the ends in separately.
Lay the blanket flat and smooth the peaks with your hands. The ripple already gives the top and bottom a decorative edge, so you can leave it without a border. If you decide to block it, follow the care instructions on your yarn label.
Thank you for stopping by Grandma’s Crafts, dear friend. Good luck with your woodland blanket! Give yourself time to get acquainted with that first little ripple, and enjoy watching the greens change as each stripe grows. I hope your blanket finds a favorite spot in your home. Happy crocheting, and I’ll see you soon for another project!
Thank you for visiting me here at Grandma’s Crafts, dear friend. Good luck with your Mountain Forests Afghan! Give yourself time to practice that first ripple, and when you finish your first stripe, hold it up to the light so you can see where the stitches begin to rise. I hope your finished blanket keeps you warm through many quiet evenings. Happy crocheting, and I’ll see you soon for another project!