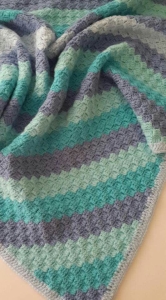
Welcome to Grandma’s Crafts! I’m so happy you are here today. Let’s talk about a technique that has been popping up everywhere lately: corner to corner crochet, or C2C for short. Today I’ll show you how to make a Corner to Corner (C2C) Blanket from the very first little tile to the last one.
Instead of working straight rows from edge to edge, a C2C blanket starts in one corner and grows on the diagonal. Each row is made of small square tiles, and each tile is just three double crochets on a short chain. You add one tile to every row until the blanket is as wide as you want, and then you take one away from every row until you reach the opposite corner.
The result is a thick, squishy fabric with a lovely woven look. And because it is built from tiles, it is perfect for stripes, for color blocks and even for pictures, just like pixels on a screen. For today we will keep it simple with a square blanket, and you can play with color as much as you like.
C2C can feel a little strange for the first few rows, so be patient with yourself. Once you see how each new tile hooks onto the one below, it becomes one of the most relaxing things to crochet. Let’s begin!
What You Need to Know First
This pattern is rated Easy. You need to be comfortable with chains, slip stitches and double crochet. The only new thing is the way the tiles connect, and I explain that in detail.
Materials
Worsted weight (#4) yarn. How much you need depends on the size of your blanket, so buy a little extra from the same dye lot for each color.
5 mm (H-8) or 5.5 mm (I-9) crochet hook, or the size recommended on your yarn label
Measuring tape
Scissors
Tapestry needle
Abbreviations (US Terms)
ch: chain
sl st: slip stitch
sc: single crochet
dc: double crochet
st(s): stitch(es)
sp(s): space(s)
* *: repeat the instructions between the asterisks as directed
How the Tiles Work
Every tile is made of a ch 3 and 3 dc. That ch 3 forms a little space on the side of the tile, which we call the ch-3 space. The next row always hooks onto those ch-3 spaces. When you are growing the blanket, you add a brand new tile at the start of each row. When you are shrinking it, you slip stitch across the top of the last tile instead of making a new one, and you leave the very last space of the row without a tile.
Pattern Notes
You turn at the end of every row.
The row number is the same as the number of tiles in that row while the blanket is growing. Row 1 has 1 tile, Row 2 has 2 tiles, and so on.
For a square blanket, the number of tiles along each edge is the number of the last increase row.
To change color, work the last yo of the last dc of a row with the new color.
Corner to Corner (C2C) Blanket Pattern
Growing the Blanket (Increase Rows)
Row 1: Ch 6. Dc in the 4th ch from the hook and in each of the next 2 ch. (1 tile)
Row 2: Ch 6, turn. Dc in the 4th ch from the hook and in each of the next 2 ch (new tile made). Sl st in the ch-3 space of the tile from Row 1, ch 3, 3 dc in the same ch-3 space. (2 tiles)
Row 3 and every increase row after it: Ch 6, turn. Dc in the 4th ch from the hook and in each of the next 2 ch. *Sl st in the ch-3 space of the next tile from the row before, ch 3, 3 dc in the same ch-3 space*. Repeat from * across. You end up with one more tile than the row before.
Keep going: Repeat the increase row until the edges of your blanket have as many tiles as you want. For example, if you want 40 tiles along each side, work 40 increase rows.
Shrinking the Blanket (Decrease Rows)
Every decrease row: Turn. Sl st in each of the first 3 dc and then sl st in the ch-3 space. Ch 3 and work 3 dc in the same ch-3 space. *Sl st in the ch-3 space of the next tile, ch 3, 3 dc in the same ch-3 space*. Repeat from * until one tile from the row before is left. Sl st in the ch-3 space of that last tile, but do not make a new tile on it. You end up with one tile fewer than the row before.
Keep going: Repeat the decrease row until only 1 tile remains. Fasten off.
Planning the Size
Make a small practice piece of about 8 increase rows. Lay it flat and measure along one straight edge, then divide by 8 to find how long one tile is. Divide the width you want for your blanket by that number to find how many tiles each side needs. A lap blanket is often around 36 by 48 inches, and baby blankets are usually somewhere between 30 and 36 inches wide. For a square blanket, simply increase until you reach your number of tiles, then decrease.
Adding a Border
Round 1: Join yarn in any corner with the right side facing you. Ch 1 and work sc evenly around, about 3 sc along the edge of each tile and 3 sc in each corner. Join with a sl st to the first sc.
Round 2: Ch 1, sc in each sc around, with 3 sc in the center stitch of each corner. Join and fasten off. Weave in all the ends.
Tips for Happy Tiles
Chain 6 loosely at the start of each increase row. Tight chains pull the edge in.
If you lose your place, remember: while growing, each row has as many tiles as its row number.
When decreasing, make sure you slip stitch across the dc, not into the chain spaces, or the edge will get lumpy.
Keep a stitch marker in the first tile of every row if you are working stripes. It makes counting easy.
VIDEO TUTORIAL
Color Ideas
Diagonal stripes happen naturally with C2C, just change colors every few rows. You can also work one half of the blanket in one color and the other half in a second color for a bold, modern look. If you enjoy it, C2C graphs let you make hearts, stars and letters, one tile at a time.
And that’s it, you have learned corner to corner crochet! Once the tiles click in your mind, this blanket is so soothing to make, and it grows faster than you might think.
I hope you enjoy every little tile. Thank you for spending this time with me, and come back soon to Grandma’s Crafts for more patterns and ideas.