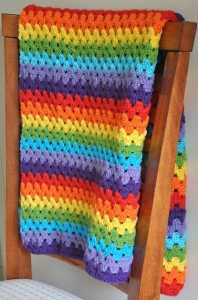
Welcome to Grandma’s Crafts! I’m so happy you are here today. If you have ever wanted to make a granny blanket but didn’t want to join a hundred little squares, this one is for you. The Granny Stripe Blanket gives you that classic granny look, worked in simple rows from one side to the other.
Every row is made of little groups of three double crochets that tuck into the spaces of the row below. Change colors every two rows and the blanket fills up with cheerful stripes. It is one of the best ways I know to use up odds and ends of yarn, and the more colors you add, the more charming it gets.
This is a lovely pattern for beginners. Once you have worked the first few rows, there are really only two rows to remember, and your hook will start finding the spaces all on its own. It is the kind of project you can pick up while chatting with family or listening to the radio.
Below I will show you how to start, how to keep the edges straight, how to change colors and how to add a simple border. Let’s get cozy and start our stripes!
About the Granny Stripe
The granny stripe is the same little three double crochet group you see in a traditional granny square, only worked back and forth in rows. The groups sit in the gaps between the groups below, so each row nestles into the one before. The edges get a half group at each end on some rows, which keeps the sides nice and straight.
Skill Level
Beginner. You need to know how to chain and double crochet.
Materials
Worsted weight (#4) yarn in as many colors as you like. How much you need depends on the size of your blanket, so gather a generous amount, or plan to use up your scraps.
5 mm (H-8) crochet hook, or the size recommended on your yarn label
Measuring tape
Scissors
Tapestry needle
Abbreviations (US Terms)
ch: chain
sl st: slip stitch
sc: single crochet
dc: double crochet
st(s): stitch(es)
sk: skip
yo: yarn over
* *: repeat the instructions between the asterisks as directed
Pattern Notes
The foundation chain is any multiple of 3, plus 1. A practice piece of 31 chains is a good way to learn the rows.
The ch 3 at the beginning of each row counts as a double crochet.
A “gap” is the space between two groups of stitches in the row below. You always work your stitches into the gaps, not into the tops of the stitches.
Rows 3 and 4 are the pattern repeat.
To change color, work the last yo of the last dc of the row with the new color, then cut the old yarn, leaving a tail to weave in.
Granny Stripe Blanket Pattern
Row 1 (Color A): Ch 31 (or any multiple of 3, plus 1). Dc in the 4th ch from the hook (the 3 skipped chains count as the first dc). *Sk 2 ch, 3 dc in the next ch*. Repeat from * until 3 chains remain. Sk 2 ch, 2 dc in the last ch. (28 sts on the practice piece: a half group at each end with 8 full groups between)
Row 2 (Color A): Ch 3, turn. Work 3 dc in each gap between the groups across the row. Dc in the top of the 3 chains you skipped at the start of Row 1. (29 sts on the practice piece: 9 groups plus one dc at each edge) Change to Color B.
Row 3 (Color B): Ch 3, turn. Dc in the first gap (the one between the edge stitch and the first group). *3 dc in the next gap*. Repeat from * until only one gap remains. Dc in that last gap, then dc in the top of the turning ch 3. (28 sts on the practice piece)
Row 4 (Color B): Ch 3, turn. Work 3 dc in each gap between the groups across the row. Dc in the top of the turning ch 3. (29 sts on the practice piece) Change to the next color.
Rows 5 and on: Repeat Rows 3 and 4, changing color every 2 rows, until the blanket is as long as you like. Finish after a Row 3 so the top edge matches the bottom. Do not fasten off if you are going straight into the border.
Planning Your Blanket Size
Work your practice piece for about 10 rows and lay it flat without stretching. Measure its width and divide by the number of stitches in Row 1 to find how many stitches you get per inch. Multiply that by the width you want for your blanket, round to the nearest multiple of 3 and add 1 to get your foundation chain. Baby blankets are often somewhere between 30 and 36 inches wide, and a lap blanket is often around 36 by 48 inches.
Chain loosely for a big blanket, or use a hook one size larger just for the foundation chain. A tight chain pulls in the bottom edge.
Simple Border
Round 1: With the right side facing you, ch 1 and work sc evenly around the whole blanket: 1 sc in each stitch across the top and bottom, about 2 sc in the side of each row along the edges, and 3 sc in each corner. Join with a sl st to the first sc.
Round 2: Ch 1, sc in each sc around, working 3 sc in the center sc of each corner. Join with a sl st to the first sc and fasten off. Weave in all the ends.
Helpful Tips
Count your groups every few rows at first. Rows 2 and 4 have one more group than Rows 1 and 3.
To save time, crochet over the yarn tails from your color changes as you work the next row.
Lay out your yarn colors before you start and decide on an order, or pick them at random for a happy scrappy look.
If the sides start to wave, check that you worked the single dc at the very beginning and end of Rows 1 and 3.
VIDEO TUTORIAL
Color Ideas
A granny stripe looks beautiful in bright rainbow colors, but it is just as pretty in a soft palette. Try creams and browns for a warm farmhouse throw, pastels for a baby blanket, or two colors only, alternated, for a clean and modern look.
Well, that’s our Granny Stripe Blanket! I love how a simple row of little groups turns into something so warm and full of personality. Every stripe is a little memory of the yarn you had on hand at the time.
Take your time, enjoy the rhythm, and don’t worry about perfection. A handmade blanket is meant to be used and loved. Thank you so much for being here, and come back soon to Grandma’s Crafts for another cozy project.