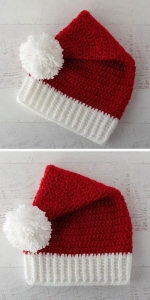
Welcome to Grandma’s Crafts! A handmade Santa hat can bring a little extra fun to the Christmas season, whether you wear it while wrapping presents, keep it ready for family photographs, or make one for a friend. This design by Edie Eckman combines a ribbed brim, a tapered red crown, and a pompom at the tip.
The familiar shape makes it festive straight away, while the crochet fabric gives it a personal touch. The original pattern includes two size options and uses a brim-first construction, making it worth reading the sizing and gauge notes before choosing your yarn.
The ribbed brim gives the hat a cozy look, while the long crown and pompom add that playful Santa silhouette. Traditional red and white are always cheerful, but burgundy and cream could make a lovely softer version. Choose a yarn that feels comfortable against the forehead, especially if you plan to wear it throughout a holiday gathering.
Making one for someone else is a sweet way to include a little crochet in your Christmas gift list. Take their head measurement before choosing between the two sizes, and keep a note of the colors they would enjoy. You could even make coordinating hats for a family photo without having every hat look exactly the same.
Once the crocheting is finished, give the small details a little extra attention. A neatly sewn brim, securely attached pompom, and carefully woven ends help the hat feel ready to wear. Then all that’s left is to put it on, bring out the wrapping paper, and enjoy a little handmade holiday fun.
Size and Fit Come First
The pattern provides Small/Medium and Large directions. The stated circumference at the bottom edge is 20 inches for Small/Medium and 22 inches for Large. In metric terms, those are approximately 51 and 56 cm; the inch measurements are the values given in the source.
These labels are size options, not age guarantees. Measure the intended wearer’s head and compare with the pattern before beginning. The separately worked brim is made to a shorter length than the final listed circumference: 18 or 20 inches, depending on the size, before its ends are joined.
That difference is part of the design. Do not replace the brim length with the final circumference just because the numbers differ. The ribbing, the subsequent crown round, and your own tension all influence the fit.
Yarn, Hook, and Supplies
The PDF lists one ball each of Red Heart Holiday in White/Silver (140), color A, and Red/Red (9090), color B. Each listed ball contains 3.5 oz (100 g) and 235 yards (215 m). Those are the source supply quantities for the project, rather than exact amounts used in each section.
The recommended hook is 5 mm, US H/8, with a yarn needle and a pompom maker for finishing. Scissors and a row counter are useful additions to your craft basket, especially when you reach the crown shaping.
If you select a substitute yarn, compare thickness and yardage, then test the fabric against the gauge. Consider how the yarn feels against the forehead as well as how it looks. A strand with holiday sparkle may be appealing, but a comfortable hat is more enjoyable to wear.
Checking the Gauge
The stated gauge is 12 double crochet stitches and 8 rounds over 4 inches. Four inches is approximately 10 cm. Width controls the circumference, while round height influences how long the tapered crown becomes.
Start with the recommended hook and make a sample in the stitch pattern. If the fabric is too large or small, test another hook size. Switching hooks without checking the result can change both fit and drape, so give the sample enough attention before moving to the hat.
The brim uses single crochet through the back loops, which creates its ribbed texture. Its tension may feel different from the double crochet crown. Measure the brim without stretching it excessively, and follow the original size directions for joining it.
Download the Free Pattern PDF
Keep the original pattern nearby for the complete stitch instructions, counts, and finishing directions. The notes below help you plan your project and choose materials.
The original pattern is rated Easy. The brim is worked back and forth as a narrow strip, then sewn into a ring. Stitches are worked around one long side of that ring to begin the crown, which continues in joined rounds.
The crown narrows with double crochet decreases, written as dc2tog in US terms. These join two stitches into one. Plain rounds between the shaping rounds help build the elongated Santa-hat silhouette rather than closing it into a short beanie.
The larger size includes additional shaping rounds. Mark your size’s instructions before starting so you do not accidentally combine the two. The numbers in parentheses belong to Large, while the unparenthesized numbers refer to Small/Medium.
Colors and Pompom Choices
Red with a white brim gives the familiar Santa look, while the named yarn’s metallic details add a little sparkle. You could also try burgundy with cream for a quieter palette, or green with a pale brim for a playful holiday version.
One detail is easy to miss: the written finishing instructions specify color B for the pompom, which is the red color in this pattern. If you prefer a white pompom, that is your own color variation. Plan for the additional white yarn it will use rather than assuming the source requires it.
Keep the pompom size in proportion to the crown. A very heavy pompom can pull on the tip and affect how the hat sits. Make a secure center tie, trim it evenly, and attach it firmly using the finishing directions.
Useful Tips While You Work
Count the stitches after the first crown round and after each decrease round. An early missed stitch can change the shape long before you notice it visually. A short note beside each finished round can help when you pick the project up again later.
Pay attention to how the beginning chain is counted and where the joining slip stitch goes. These details keep the round structure consistent. If your join looks untidy, check its placement before adding another round rather than trying to hide the problem at the end.
When sewing the brim ends, use a neat seam that feels comfortable inside the hat. Weave the tails through the wrong side without creating a bulky knot where it will press against the wearer.
Wearing, Giving, and Looking After Your Hat
A Santa hat makes a cheerful accessory for gift wrapping, a holiday gathering, or a quick family photo. If you are making several, note which brim length belongs to each person and label the pieces while they are in progress.
For a gift, tuck in a little note with the yarn’s care instructions. Washing requirements depend on the yarn you actually use, and the pompom should be considered when cleaning the hat. Keep the ball band until you have finished and recorded that information.
Store the hat clean and dry between seasons, with the pompom arranged so it is not crushed beneath heavier decorations. Bringing it out next December can become one more small handmade part of your holiday routine.
VIDEO TUTORIAL
Save the Pattern for Your Next Craft Session
Ready to make your own? Download the PDF below and read through the original directions before you begin. You can print it or keep it open beside your work so the pattern is easy to follow.
Pattern credit: Santa Hat by Edie Eckman for Red Heart/Coats & Clark, pattern RHC0816-023220M. The PDF supplies the complete size-specific instructions. Color changes described here are optional ideas.