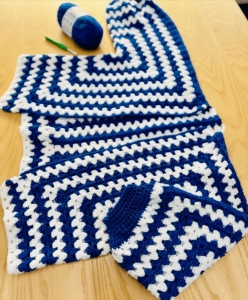
Welcome to Grandma’s Crafts! I’m so happy you are here today. I have such a fun wearable project to share with you, especially if you have ever looked at a crochet cardigan and thought it must be far too complicated to make. This Crochet Hexagon Cardigan has a really clever construction, and once you understand how those two hexagons come together, the whole thing starts to make much more sense.
I think that is what first made me curious about this style of cardigan. You begin with something that does not look much like a sweater at all, just a large crochet hexagon, and somehow it folds into a sleeve and part of the body. Make a second one, place the two pieces together, and suddenly you can already see the shape of a cardigan appearing.
There is also something very satisfying about watching the granny-style clusters grow round by round. You can use one color for a softer, more classic look, alternate a few favorite shades, or turn it into a colorful scrap yarn project. Every version can look completely different even though the basic construction stays the same.
And unlike a cardigan that is worked from dozens of separate pieces, most of the shape here comes directly from those two main sections. There is still some joining and finishing to do, of course, but I love that you can actually see the garment taking shape quite early in the project.
How This Hexagon Cardigan Comes Together
The cardigan begins with two matching granny-style hexagons. Each one is worked outward until there is enough fabric to create the sleeve depth. At that point, the pattern becomes a little more interesting because you do not necessarily keep enlarging every side of the hexagon.
Instead, selected sides can be extended to add more room across the front, back, and lower body while leaving the sleeve area alone. I really like this part of the construction because it gives you much more control over the fit. You are not forced to make the sleeves wider just because you need a little more space around the chest.
Once both pieces are ready, the hexagons are folded into those familiar L-shaped sections. The back edges are joined together, the upper portions form the shoulders, and the long folded sections become the sleeves. It is one of those crochet constructions that feels almost like a little puzzle the first time you see it.
The cardigan can also be adjusted quite easily as you work. You can make the sleeves longer, add more length to the bottom, leave the front open, or add a simple edging and buttons.
That flexibility is one of the reasons hexagon cardigans have become such a popular project. You can use the same basic idea and still end up with something that feels completely your own.
This crochet cardigan is made from two granny-style hexagons. Each hexagon is first worked evenly on all six sides to establish the sleeve depth. After that, only three sides are extended to create extra room for the chest and body without making the sleeves wider.
The two pieces are then folded, joined at the back and shoulders, and finished with sleeves, cuffs, extra body length, and a simple front edging.
Skill Level
Intermediate
Materials
Light weight or light worsted yarn
5.0 mm crochet hook, or size needed to obtain a fabric you like
Stitch markers
Yarn needle
Scissors
Measuring tape
Buttons, optional
For reference, the original Horizon version uses a 5.0 mm hook with a light acrylic yarn measuring approximately 550 m per 200 g.
Abbreviations
ch = chain dc = double crochet sl st = slip stitch sp = space st(s) = stitch(es) cl = cluster fpdc = front post double crochet bpdc = back post double crochet RS = right side WS = wrong side
Cluster
Work 3 dc in the same space.
Corner
Work:
(cl, ch 2, cl)
in the indicated corner space.
Before You Begin
This cardigan is easiest to customize using measurements rather than relying only on a fixed number of rounds.
You will need:
Arm Depth: Measure around the arm where you want the sleeve to fit.
Finished Chest: Measure around the bust or chest and add any positive ease you would like.
Quarter Chest: Divide your desired finished chest circumference by 4.
Finished Length: Measure from the shoulder to where you want the cardigan to end.
Center Back to Wrist: Measure from the center of the upper back, across the shoulder, and down to the wrist.
The original Horizon pattern uses this same made-to-measure approach and provides Arm Depth, Quarter Chest, garment length, and Center Back to Wrist measurements for XS through 5XL.
Hexagon
Make 2 identical pieces.
Turn your work after every round.
Round 1
Make a magic ring.
Ch 3. The beginning ch-3 counts as the first dc.
Work 2 dc into the ring.
Ch 2.
3 dc into the ring, ch 2.
Repeat from * to * 5 more times.
Join with sl st to top of beginning ch-3.
You should have:
6 clusters and 6 ch-2 corner spaces.
Turn.
Round 2
Sl st into first ch-2 corner sp.
Ch 3, 2 dc in same sp.
Ch 2, 3 dc in same sp.
In each remaining corner space around, work:
(cl, ch 2, cl)
Join with sl st to top of beginning ch-3.
Turn.
You should now have 2 clusters along every side.
Round 3
Sl st into first corner sp.
Work:
(cl, ch 2, cl)
in that corner.
Work 1 cl in each space between clusters along the side.
At the next corner, work:
(cl, ch 2, cl)
Continue around in the same manner.
Join and turn.
Continue the Hexagon
Repeat Round 3.
On every new round:
work 1 cl in every space between clusters
work (cl, ch 2, cl) in every corner
Each round adds one additional cluster to every side.
Do not worry if the hexagon becomes wavy instead of lying flat. That extra fabric is what allows it to fold into a sleeve and body section. This is normal in granny hexagon cardigan construction.
Continue until one side of the hexagon reaches your Arm Depth measurement.
Do the same number of rounds for both hexagons.
Extending the Body
Now stop working around all six sides.
You will work back and forth across three consecutive sides only.
These three sides will eventually become:
Front + Bottom + Back
The other three sides will remain unchanged and become the sleeve area.
Place markers at the beginning and end of the three sides you will extend.
Extension Row 1
Begin at the outer corner of the first marked side.
Ch 3, 2 dc in same corner sp.
Work 1 cl in every space between clusters along the first side.
At the first internal corner, work:
(cl, ch 2, cl)
Continue with 1 cl in every space across the middle side.
At the next internal corner, work:
(cl, ch 2, cl)
Continue across the third side.
Work 1 cl in the final outer corner.
Turn.
Extension Row 2
Ch 3.
Work 1 cl in each space between clusters across the first side.
Continue maintaining:
(cl, ch 2, cl)
in each of the two internal corners.
Work across the final side.
Dc in top of turning ch.
Turn.
Extension Row 3
Ch 3.
Work 2 dc in first available cluster space.
Continue with 1 cl in each space across.
Maintain:
(cl, ch 2, cl)
in both internal corners.
When 1 space remains at the opposite edge, work 2 dc in that space.
Dc in top of turning ch.
Turn.
Continue
Repeat Rows 2 and 3.
These rows add fabric to the front, bottom, and back while leaving the sleeve section unchanged.
Every few rows, fold the hexagon into an L shape and check the fit.
Continue until the distance from the folded center/back area to the outer front edge reaches your Quarter Chest measurement.
Finish both hexagons with the same number of extension rows.
This selective extension is the key feature I wanted to verify. The Horizon pattern explicitly uses three sides for this stage, while several other hexagon cardigans use comparable selective side extensions specifically to increase chest/body width without making the sleeve larger.
Folding the Hexagons
Fold each finished piece so the sleeve sides meet.
Each hexagon should naturally collapse into an L shape.
Lay the two folded pieces next to each other as mirror images.
You should now be able to identify:
two sleeves
two front sections
the bottom edges
two back edges that will meet at center back
At this point, pinning everything before sewing is very helpful.
Joining the Back
Place the two center-back edges together.
Using matching yarn, join them with:
slip stitches, mattress stitch, or whip stitch.
Work from the bottom toward the neckline.
Fasten off securely.
A flat sewn seam is perfectly suitable here and is simpler than reproducing the decorative join used in the source pattern.
Shoulder and Sleeve Seams
With the cardigan laid flat, line up the upper edges of each folded hexagon.
Leave an opening at the center back for the neckline.
As a starting point, leave approximately 3 granny spaces on either side of the center-back seam unseamed.
Pin the shoulder and sleeve edges together.
Try the cardigan on if possible before making the seam permanent.
Join each side from the outer sleeve edge toward the neckline.
Fasten off and weave in ends.
Sleeves
Repeat for both sleeves.
Join yarn at the underarm seam.
Sleeve Round
Ch 3, 2 dc in same sp.
Work 1 cl in each granny space around.
Join with sl st to top of beginning ch-3.
Turn.
Repeat this round until the sleeve reaches approximately 3 to 4 inches shorter than your desired finished length.
Use your Center Back to Wrist measurement as a guide.
The original pattern also works the sleeves directly from the completed body and reserves approximately 4 inches for decreasing and cuff ribbing.
Sleeve Taper
If you like a wide sleeve, you can skip the taper and go directly to the cuff.
For a narrower wrist:
Decrease Round 1
Ch 3.
Work 2 dc into each granny space around.
Join.
Decrease Round 2
Ch 3.
Work dc around, placing a dc2tog periodically until the sleeve opening fits comfortably around the wrist.
Make sure you finish with an even number of stitches for the ribbing.
Join.
Decrease Round 3
Ch 3.
Dc in each stitch around.
Join.
Ribbed Cuff
Cuff Round 1
Ch 2.
Fpdc around next dc, bpdc around next dc.
Repeat around.
Join.
Cuff Rounds 2–7
Repeat Cuff Round 1, always working fpdc around fpdc and bpdc around bpdc.
Add or remove rounds depending on how wide you want the cuff.
Fasten off.
Repeat for second sleeve.
Adding Body Length
If the cardigan is already long enough, skip this section.
With RS facing, join yarn at one lower front corner.
Work across the entire bottom edge.
Row 1
Ch 3, 2 dc in first space.
Work 1 cl in each granny space across, including the center-back join.
Work 3 dc in final corner.
Turn.
Row 2
Ch 3.
Work 1 cl in each space between clusters across.
Dc in top of turning ch.
Turn.
Row 3
Ch 3.
Work 2 dc in first space.
Work 1 cl in each space across.
Work 2 dc in final space.
Dc in top of turning ch.
Turn.
Repeat Rows 2 and 3 until the cardigan reaches your desired finished length.
Front and Neck Edging
For a simpler finish than the source version, work a clean border around the entire front opening and neckline.
Join yarn at one lower front corner.
Edging Round 1
Ch 1.
Sc evenly up the first front edge.
Continue around the neckline.
Sc evenly down the second front edge.
Work across the bottom edge.
Place 3 sc in each lower corner to help the border turn neatly.
Join with sl st.
Edging Round 2
Ch 1.
Sc in each stitch around.
Work 3 sc in each lower corner.
Join and fasten off.
You can repeat this round if you prefer a wider front band.
Optional Buttons
Sew buttons evenly along one front edge.
The open spaces in the crochet fabric can often be used naturally as buttonholes, or you can create dedicated buttonholes in the final edging round by replacing 2 stitches with:
ch 2, sk 2 sts
Position each button directly opposite its buttonhole.
The Horizon sample uses 6 to 8 buttons and recommends spacing them closely enough to prevent the front from gaping.
Finishing
Weave in all remaining ends.
Gently block the cardigan to even out the granny clusters and seams.
Try it on before final blocking and check the sleeve length, body length, front overlap, and neckline.
VIDEO TUTORIAL
I also think this is a nice project if you are ready to move beyond blankets and scarves but do not necessarily want to jump straight into a very fitted garment. Because the shape is relaxed and the sizing can be checked while you work, there is a little more room to experiment without feeling like every stitch has to match a complicated tailoring chart.
Yarn choice will make a big difference too. A lighter yarn will give the cardigan more movement and drape, while a slightly heavier yarn can make it feel extra cozy. If you are using several colors, the granny-style clusters are perfect for showing them off without needing complicated colorwork.
Do not be surprised if the hexagons look a little strange while you are working on them. They are not meant to behave like perfectly flat granny squares. The extra fabric is what allows each piece to fold into the shape needed for the sleeve and body, so sometimes the project only really makes sense once you stop and fold it.
And that might be my favorite part of making something like this. At first you are simply crocheting clusters around a hexagon, then suddenly you fold the piece and realize you have made half a cardigan without even noticing.
I hope you enjoy making your own Crochet Hexagon Cardigan and playing around with the colors, sleeve length, and overall fit. It is such a creative way to make a wearable crochet piece, and once you understand the construction, you may find yourself already planning the colors for the next one. Thank you for spending a little crochet time here with me at Grandma’s Crafts, and I hope this pattern earns a place on your project list.