Crochet Christmas Gift Bags: 3 Cute Drawstring Designs
Welcome to Grandma’s Crafts! I’m so happy you are here today. There is something extra sweet about wrapping a little Christmas gift in something handmade, especially when the wrapping becomes part of the gift too.
These little crochet drawstring bags are perfect for candy, small toys, gift cards, jewelry, ornaments, or any of those tiny surprises we love tucking under the Christmas tree.
Today I’m sharing three different Christmas gift bag ideas using the same simple bag shape.
You can make a Christmas Tree Gift Bag, a Reindeer Gift Bag, or keep the bag completely simple and decorate it with any Christmas appliqué you already love.
The finished bags are small, quick projects, and they are also a lovely way to use leftover yarn from other Christmas makes.
Crochet Christmas Gift Bag Pattern
Finished Size
Approximately:
4.5 inches wide x 5 inches tall
The exact size may vary slightly depending on your yarn, hook, and tension.
Skill Level
Easy to Intermediate
The basic bag is beginner friendly. The Christmas tree and reindeer versions include simple color changes.
Materials
For each bag you will need:
DK or light worsted weight yarn
3 mm crochet hook
Yarn needle
Scissors
Stitch markers, optional
For the Christmas Tree Bag:
Main color
Green yarn
Brown yarn
Small amounts of yellow, red, white, or other colors for decorating
For the Reindeer Bag:
Main color
Light or medium brown yarn
Dark brown yarn
Black yarn
Red yarn
For the Basic Christmas Bag:
One main color
Your favorite crochet Christmas appliqué
Abbreviations
US crochet terminology is used throughout this pattern.
ch = chain
sc = single crochet
sl st = slip stitch
st = stitch
sts = stitches
sk = skip
rnd = round
RS = right side
WS = wrong side
MC = main color
Pattern Notes
The bags are made from two rectangular panels.
The front panel can include a Christmas design, while the back panel is worked completely in the main color.
After the two panels are joined, a simple eyelet border is worked around the top for the drawstrings.
Chain 1 at the beginning of a row does not count as a stitch.
Each panel has 24 stitches.
When changing colors, work the final yarn over of the previous single crochet with the new color.
For the colorwork sections, carry the main color loosely behind the contrasting stitches. Avoid pulling the carried yarn too tightly or the panel may pucker.
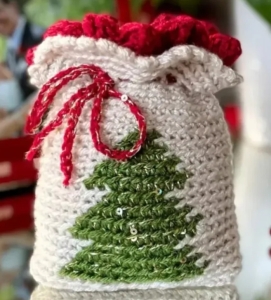
1. Christmas Tree Crochet Gift Bag
This little tree bag is such a classic Christmas project. You can leave the tree simple or decorate it afterward with tiny embroidered ornaments.
Colors
For this version:
MC = cream, white, red, or another background color
G = green
B = brown
Christmas Tree Front Panel
With MC:
Ch 25.
Row 1
Sc in the second ch from the hook and in each ch across.
24 sc
Ch 1 and turn.
Rows 2 to 6
Sc in each st across.
24 sc
Ch 1 and turn after each row.
Now begin the Christmas tree.
Row 7
11 sc MC, 2 sc G, 11 sc MC.
24 sts
Row 8
10 sc MC, 4 sc G, 10 sc MC.
Row 9
9 sc MC, 6 sc G, 9 sc MC.
Row 10
8 sc MC, 8 sc G, 8 sc MC.
Row 11
7 sc MC, 10 sc G, 7 sc MC.
Row 12
9 sc MC, 6 sc G, 9 sc MC.
This slight narrowing begins the second section of the tree.
Row 13
7 sc MC, 10 sc G, 7 sc MC.
Row 14
6 sc MC, 12 sc G, 6 sc MC.
Row 15
5 sc MC, 14 sc G, 5 sc MC.
Fasten off green.
Row 16
10 sc MC, 4 sc B, 10 sc MC.
Row 17
10 sc MC, 4 sc B, 10 sc MC.
Fasten off brown.
Rows 18 to 26
Using MC, sc in each st across.
24 sc
Fasten off.
Christmas Tree Back Panel
With MC:
Ch 25.
Row 1
Sc in second ch from hook and each ch across.
24 sc
Rows 2 to 26
Ch 1, turn.
Sc in each st across.
24 sc
Fasten off.
Decorating the Christmas Tree
Before assembling the bag, you can add little decorations to the tree.
Use small amounts of contrasting yarn to make tiny straight stitches or French knots across the green section.
Try:
Red
White
Gold
Pink
Light blue
You can also embroider a small yellow star above the top of the tree.
Keep the decorations simple. A few tiny pops of color are usually enough.
Assemble the Tree Bag
Place the front and back panels together with the right sides facing outward.
Using MC, join the panels along:
First side
Bottom
Second side
You can whip stitch them together with a yarn needle or use slip stitches with your crochet hook.
Leave the top open.
Drawstring Edge
Join MC at one side seam along the top opening.
Each panel has 24 stitches, giving you approximately:
48 sts around the opening
Round 1
Ch 1.
Sc evenly around the entire opening.
Join with sl st to first sc.
48 sc
Round 2
Ch 1.
Sc in next 3 sts, ch 1, sk 1 st.
Repeat around.
Join with sl st.
You should have 12 eyelets.
Round 3
Ch 1.
Sc in each sc and each ch-1 space around.
Join with sl st.
48 sc
Fasten off.
Drawstrings
Make two cords.
For each cord:
Ch 80.
Fasten off, leaving a small tail.
Thread the first cord through the eyelets all the way around the bag, beginning and ending on one side.
Thread the second cord through the same eyelets, beginning and ending on the opposite side.
Tie the ends of each cord together.
Pull both cords at the same time to close the bag.
Your Christmas Tree Gift Bag is finished!
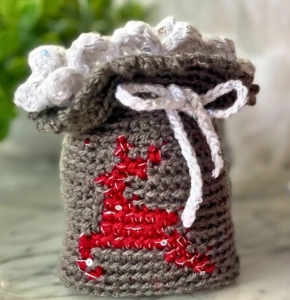
2. Reindeer Crochet Gift Bag
The reindeer version uses the same little bag shape, but this time we crochet a simple reindeer face directly into the front panel.
A red nose at the end gives it that unmistakable Christmas look.
Colors
You will need:
MC = cream, white, red, green, or another background color
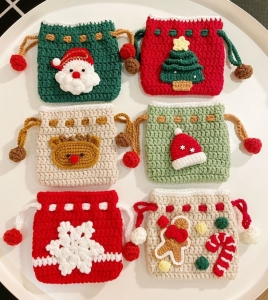
Instead of using it as a hanging ornament, you can simply attach the little Santa to the front of the bag as an appliqué.
If you make the hanging loop, you can tuck it behind the Santa before sewing him onto the bag. You can also leave the loop off completely when you know you are making him specifically for the gift bag.
A red, cream, green, or even soft beige bag would look lovely with Santa on the front.
Assemble the Basic Bag
Place the two panels together.
Join along the first side, bottom, and second side.
Leave the top completely open.
Drawstring Edge
Join yarn at one side seam.
Round 1
Ch 1.
Sc evenly around the opening.
Join with sl st.
48 sc
Round 2
Ch 1.
Sc in next 3 sts, ch 1, sk 1.
Repeat around.
Join with sl st.
Round 3
Ch 1.
Sc in each sc and each ch-1 space around.
Join with sl st.
48 sc
Fasten off.
Drawstrings
Make two cords.
For each:
Ch 80.
Fasten off.
Thread the first cord through all of the eyelets with both ends coming out on one side of the bag.
Thread the second cord in the opposite direction with both ends coming out on the other side.
Tie the ends together.
Pull both cords outward and your little Christmas pouch closes right up.
Make Them in Different Christmas Colors
This is one of those patterns where changing the colors completely changes the personality of the project.
For a traditional Christmas look, try:
Red + White + Green
For something softer:
Cream + Sage + Dusty Red
For a more playful Christmas palette:
Pink + Red + White
Or keep everything neutral with:
Cream + Beige + Brown
You can also use the same bag pattern for all three designs so they look like a matching little Christmas collection.
What Can I Put Inside a Crochet Christmas Gift Bag?
These bags are perfect for smaller gifts such as:
Chocolates
Candy
Gift cards
Jewelry
Small toys
Christmas ornaments
Mini beauty products
Handmade soaps
Cookies wrapped in food-safe packaging
Small crochet gifts
They also make adorable little stocking stuffers.
And because the bag itself can be reused, it feels much nicer than wrapping something in paper that will immediately be thrown away.
A Little Tip Before You Make Several
Make your first bag completely before starting a whole batch.
That gives you a chance to check the finished size with your yarn and tension.
If you want a slightly wider bag, simply add stitches to the starting chain for both panels.
If you want it taller, add more plain rows before working the drawstring edge.
Just remember to make the front and back panels exactly the same size.
VIDEO TUTORIAL
Three Bags, So Many Possibilities
I really love patterns like this because once you understand the basic little bag, you can turn it into almost anything.
Make the tree version for one gift, the reindeer for another, and then use the plain version whenever you have a cute Christmas appliqué waiting for the perfect project.
You could even make a whole basket of them before Christmas and use them whenever you need a quick handmade gift package.
I hope these little Christmas bags bring a little extra handmade joy to your holiday season. Happy crocheting!