Materials
You will need:
- Soft baby yarn (lightweight, gentle on the skin)
- Crochet hook US G/6 (4 mm)
- 5 buttons
- Stitch markers
- Yarn needle
Sizes:
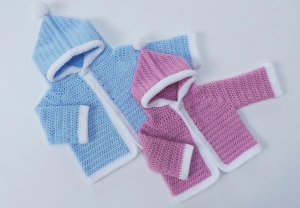
6, 12, 18, and 24 months (as shown on page 1)
Gauge
15 hdc × 10 rows = 4″
This pattern uses mostly half double crochet (hdc).
Stitches (US Terms)
- ch = chain
- hdc = half double crochet
- sc = single crochet
- sl st = slip stitch
- hdc2tog = half double crochet decrease
Turning chain does NOT count as a stitch (important detail from page 1).
CONSTRUCTION OVERVIEW
This cardigan is made in pieces:
Back
Left Front
Right Front
Sleeves
Hood
Then everything is gently sewn together.
BACK PANEL
- Ch foundation
- Work rows of hdc evenly
As described on page 1:
- Continue until desired length is reached
Armholes
- Slip stitch across a few stitches at each side
- Continue working the center
This creates space for the sleeves.
FRONT PANELS (Left & Right)
Worked similarly to the back, but smaller.
Steps:
Begin with shorter chain
Work hdc rows
Shape armhole (same method as back)
Neck shaping
Now we gently shape the neckline:
- Leave some stitches unworked
- Use hdc decreases near the edge
This creates a soft, rounded front opening.
SLEEVES
Chain foundation
Work hdc rows
Increasing:
Add stitches at both ends of certain rows
This widens the sleeve gradually.
Continue until desired length.
HOOD
The hood is worked flat:
Chain across
Work rows of hdc
Shaping:
Decrease slightly on both sides
Continue until proper height
Then:
Fold in half
Sew the top seam
As shown in the diagram on page 3, this forms the hood shape.
ASSEMBLY
Now we bring everything together:
Sew shoulder seams
Attach sleeves to armholes
Sew sides and sleeve seams
Attach hood to neckline
Take your time here, dear, this is where your cardigan comes to life.
BUTTON BANDS
Buttonhole side:
Work rows of sc along front edge
Create spaces (ch 1, skip 1 st) for buttons
Opposite side:
Work plain sc rows
EDGING
Work around entire cardigan:
Single crochet evenly around edges
Optional:
Reverse sc (for a neat cord-like edge)
Or decorative shell edging
FINAL TOUCHES
Sew buttons in place
Weave in all ends
Lightly shape your garment
And just like that… your little hoodie is ready.
My dear, this cardigan is more than just a garment, it’s warmth, care, and love stitched into something a little one can wear. Each row you make carries a quiet tenderness, and that is what makes handmade pieces so special.
And then comes the hood, such a sweet and charming detail. Worked flat and then carefully sewn, it adds both warmth and character to the cardigan. As shown in the diagram on page 3 of the PDF, folding and shaping the hood creates that familiar, cozy silhouette that frames a baby’s face so beautifully.
The finishing touches are what truly bring everything together. The button bands, worked along the front edges, not only add structure but also a practical way to close the cardigan. The edging, whether kept simple or made decorative, gives the entire piece a polished and delicate look. And finally, the buttons, small details that add both function and charm.
As you complete your hoodie, weaving in the last ends and gently shaping the fabric, you may find yourself smiling at what you’ve created. This is more than just a garment, it is warmth, patience, and love stitched together, ready to be worn and cherished.
Thank you, my dear, for spending this time with me here at Grandma’s Crafts. I warmly invite you to explore our other articles, where many more cozy patterns, gentle guides, and heartfelt inspirations are waiting just for you.


