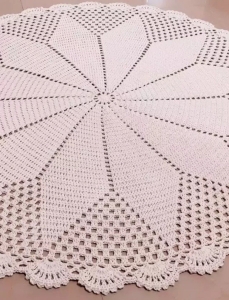
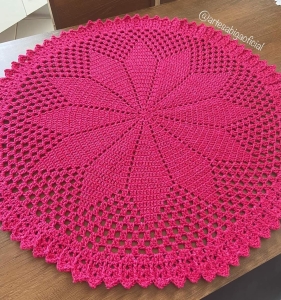
Welcome to Grandma’s Crafts! 🧶 There’s nothing quite like adding a little handmade warmth to your home. Today, we’re sharing a beautiful round crochet rug with a lovely shell and picot border. Grab your favorite yarn, settle into your comfy spot, and let’s take it one round at a time!
Most of the rug uses familiar stitches and repeating sequences. Once you understand how the sections develop, the construction becomes easier to follow, and each round brings a little more of the design into view.
A Classic Design with a Decorative Finish
The rug is worked from the center outward in joined rounds. Twelve repeating sections form the foundation, gradually widening before transitioning into narrower shapes surrounded by small double crochet groups.
The border adds another layer of detail. Repeated shells create a gently scalloped edge, while picots give the final round a delicate finish.
A natural cotton shade lets the stitch pattern stand out, but you can choose a color that suits your space.
This round rug begins with an expanding double crochet center, develops into tapered sections surrounded by smaller stitch groups, and finishes with a shell and picot border.
Materials and Finished Size
Brazilian No. 6 cotton crochet cord
3.5 mm crochet hook
Scissors
Tapestry needle
The designer’s sample measures approximately 59 inches (1.5 meters) across and uses approximately 2,275 grams of cord. Your measurements and yarn requirements may vary with tension and materials.
Brazilian No. 6 cord is not the same designation as US category 6 yarn. Compare thickness and fabric when selecting a substitute.
No measured gauge is provided in the transcript. Check frequently that your rug lies flat.
Abbreviations
All terms are US crochet terms.
ch: chain
sl st: slip stitch
dc: double crochet
st / sts: stitch / stitches
sp: space
sk: skip
rep: repeat
Shell: Work (2 dc, ch 2, 2 dc) into the indicated stitch or space.
Picot: Ch 3, then sl st into the first chain made.
Final shell: Work 3 dc into the indicated space, make one picot, work 3 more dc into the same space, then make another picot. This is a defined adaptation of the tutorial’s two-picot finish.
Pattern Notes
Work in joined rounds without turning.
The beginning ch 3 in Rounds 1 and 2 counts as a dc.
From Round 3 onward, the beginning ch 2 counts as a dc.
Join to the top of the beginning chain unless directed otherwise.
Instructions in brackets are repeated the stated number of times.
Stitch counts include the beginning chain when it counts as a dc.
Groups of 2 dc are two separate stitches, not a dc2tog.
Keep the chain spacing consistent with the written instructions initially. Adjust only if your fabric needs it to lie flat.
Center
Round 1
Make a magic ring. Ch 3, work 11 dc into the ring. Pull the ring closed and join with a sl st to the top of the beginning ch 3.
Count: 12 dc.
Alternatively, ch 5 and join with a sl st to form a ring, then work the same stitches into it.
Round 2
Ch 5; this counts as 1 dc and ch 2.
[Dc in the next st, ch 2] 11 times. Join with a sl st to the third chain of the beginning ch 5.
Count: 12 dc and 12 ch-2 spaces.
Round 3
Sl st into the first ch-2 sp. Ch 2, work 2 dc into the same sp, ch 1.
[Work 3 dc in the next ch-2 sp, ch 1] 11 times. Join.
Count: 12 groups of 3 dc and 12 ch-1 spaces.
Expanding Sections
Round 4
Ch 2, dc in the next st, 2 dc in the last st of the first group, ch 1.
For each remaining group, work 1 dc in every st except the last, work 2 dc in the last st, then ch 1. Do not work into the chain spaces.
Join.
Count: 12 groups of 4 dc and 12 ch-1 spaces.
Rounds 5–30
Ch 2, counting it as the first dc of the first group. Work 1 dc in each remaining st of that group except the last. Work 2 dc in the last st, ch 1.
For each remaining group, work 1 dc in every st except the last, work 2 dc in the last st, then ch 1.
Join.
Each group gains one dc per round.
Round 30 count: 12 groups of 30 dc and 12 ch-1 spaces.
Tapered Sections
In this stage, leave the first and last stitches of each large group unworked. Between the large groups, work new 2-dc groups into the chain spaces.
The large groups become narrower while the smaller groups between them increase in number.
Round 31
Sl st into the second dc of the first large group. Ch 2; this counts as the first dc worked in that second stitch.
Work dc in each following st through the next-to-last st of the group. Leave the last st unworked. Ch 1, work 2 dc in the next ch-1 sp, ch 1.
For each remaining large group:
Sk its first st.
Work dc in each st through its next-to-last st.
Sk its last st.
Ch 1, work 2 dc in the next ch-1 sp, ch 1.
Join.
Count: 12 large groups of 28 dc, with one 2-dc group between each pair of large groups.
Round 32
Sl st into the second dc of the first large group. Ch 2, then work dc through the next-to-last st. Leave the last st unworked.
Ch 1, work 2 dc in the next ch-1 sp, ch 1. Skip the existing 2-dc group. Work 2 dc in the following ch-1 sp, ch 1.
Repeat around, leaving the first and last stitches of every large group unworked. Between large groups, work 2 dc into every ch-1 sp, with ch 1 between groups. Skip all existing small 2-dc groups.
Join.
Count: 12 large groups of 26 dc, with two 2-dc groups between each pair of large groups.
Rounds 33–44
Continue the same method:
Sl st into the second stitch of the first large group.
Ch 2, then work dc through its next-to-last stitch.
Leave its last stitch unworked.
Ch 1.
Between large groups, work (2 dc, ch 1) into each ch-1 sp, skipping the existing small 2-dc groups.
For every remaining large group, skip its first and last stitches and work dc into the stitches between them.
Join after the final ch 1.
Each round removes 2 dc from every large group and adds one small group between neighboring large groups.
Round
Dc in each large group
Small groups between large groups
33
24
3
34
22
4
35
20
5
36
18
6
37
16
7
38
14
8
39
12
9
40
10
10
41
8
11
42
6
12
43
4
13
44
2
14
Round 44 count: 180 groups of 2 dc, with 180 ch-1 spaces between them.
Solid Border Foundation
Round 45
Ch 2, dc in the next st.
Continue around, working 1 dc into every dc. In the chain spaces, repeat this sequence:
Work 1 dc into each of the next four ch-1 spaces.
Work 2 dc into the fifth ch-1 space.
Repeat that chain-space sequence 36 times around, while continuing to work dc into every stitch.
Join.
Count: 576 dc.
This count follows the stated chain spacing and increase placement. If you have adjusted either, recount before beginning the shell border.
Shell Border
Round 46
Ch 2. In the same st, work (1 dc, ch 2, 2 dc), completing the first shell.
[Sk 2 sts, dc in the next st, sk 2 sts, shell in the next st] 95 times.
Sk 2 sts, dc in the next st, sk the final 2 sts. Join to the top of the beginning ch 2.
Count: 96 shells and 96 individual dc.
Round 47
Sl st into the next dc, then sl st into the shell’s ch-2 sp.
Ch 2, work (1 dc, ch 2, 2 dc) into the same sp. Dc into the individual dc between this shell and the next.
[Shell in the next shell’s ch-2 sp, dc in the next individual dc] around. Join.
Do not work into the other stitches of the shells.
Count: 96 shells and 96 individual dc.
Round 48
Repeat Round 47.
Round 49
Sl st across to the first shell’s ch-2 sp.
Ch 2, work (1 dc, ch 2, 2 dc) into the same sp. Ch 1, dc in the next individual dc, ch 1.
[Shell in the next shell’s ch-2 sp, ch 1, dc in the next individual dc, ch 1] around. Join.
Rounds 50–56
Repeat Round 49, working shells into shell ch-2 spaces and individual dc into individual dc. Leave the separating ch-1 spaces unworked.
Count per round: 96 shells, 96 individual dc, and 192 separating ch-1 spaces.
Picot Edging
Round 57
Sl st across to the first shell’s ch-2 sp.
Ch 2, work 2 dc into the same sp. Make a picot. Work 3 more dc into the same sp, then make another picot.
Ch 1, dc in the next individual dc, ch 1.
[Final shell in the next shell’s ch-2 sp, ch 1, dc in the next individual dc, ch 1] around.
Join to the top of the beginning ch 2. Fasten off.
For a simpler finish, omit the second picot from every final shell.
Finishing and Fit
Weave in all ends securely on the wrong side. Lay the rug flat and gently arrange the edging.
Throughout the project, check for cupping or rippling. The designer suggests adjusting hook size or chain spacing to suit your tension. Additional chains can help relieve cupping; fewer separating chains or a smaller hook may help with rippling. Recheck after each adjustment.
For a different size, end the expanding section on an even-numbered round. Continue the tapered sections until each large group contains 2 dc. The later round numbers and border counts will change, so the counts above apply specifically to the 30-round expanding section.
VIDEO TUTORIAL
These videos are in Portuguese. Turn on captions and watch the hand movements closely to follow along.
Making a Smaller or Larger Rug
The expanding section can be adjusted to change the size. The designer recommends ending it on an even-numbered round, adding or removing rounds in increments of two.
That allows the later tapered sections to finish with two double crochet stitches each.
Changing this section also changes the later round numbers, stitch counts, and yarn requirements. Use the construction sequence as your guide rather than expecting every count from the original size to remain the same.
Finishing Your Handmade Rug
Once the edging is complete, fasten off and weave in the ends securely on the wrong side. Lay the rug flat and gently arrange the border so you can see the finished shape.
This project offers a lovely combination of repetition and detail. The center gives you a steady sequence to settle into, the tapered sections add interest, and the shell border brings the whole design together.