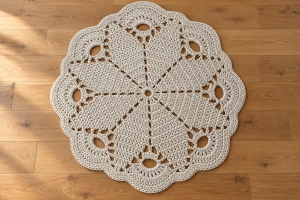
During rounds 2 through 6, increases at both ends of each solid section make those sections wider. Chain spaces remain between them, keeping the eight repeats distinct. This is a good stage to pause after each round and check that every section matches before moving on.
Round 7 begins a change in the shape. The solid sections start narrowing, while the spaces between them become more open. Rounds 8 and 9 continue that transition, using single crochet stitches and chain arches to prepare the outer edge.
In round 10, fans are worked into the chain arches, giving the rug its rounded scallops. Round 11 follows the fans and connects the remaining sections. The last two rounds add a single crochet edging and a finishing round of slip stitches worked into the back loops.
Once the crocheting is complete, fasten off and secure the ends. Damp blocking helps settle the rug into its finished shape: arrange it on towels, gently adjust the outline, and allow it to dry completely.
Keep this overview beside you as a guide to the construction, then follow the complete pattern for the exact stitch placements, counts, and repeats. The instructions use US crochet terminology.
GIANT DOILY RUG PDF PATTERN
A Closer Look at the Design
The rug features eight radiating points, openwork spaces, and a scalloped outline. Its combination of solid sections and airy details gives it the appearance of an oversized doily.
Finished Size and Supplies
The reference rug measures approximately 4 feet (122 cm) in diameter. Its supplies include:
- Approximately 1,400 feet (427 m) of braided cotton clothesline, about 7/32 inch (5.6 mm) thick.
- A 10 mm crochet hook.
- Scissors, sewing thread, and a needle for joining rope ends.
Different cord, hook sizes, and tension can change the finished dimensions and material requirements.
Before You Begin
The instructions use US crochet terminology and include chains, single crochet, double crochet, and slip stitches. The rug is worked from the center outward over 13 rounds.
Thick rope can be demanding on your hands. Support the growing rug while working and take breaks when needed. Finishing includes damp blocking to help the piece lie flat.
Get the Giant Doily Rug Pattern
Ready to plan your own? Open the free pattern for the round-by-round instructions and illustrated rope-joining tutorial.
VIEW THE GIANT DOILY RUG PATTERN
Thank you for visiting Grandma’s Crafts today. I hope this project gives you a lovely idea for a corner of your home, and I wish you good luck as you choose your supplies and begin crocheting.
While you are here, explore our other crochet articles for your next handmade project. Come back for new patterns shared weekly, and have a wonderful week, dear friends!