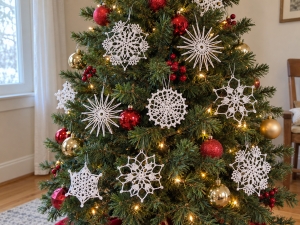
Welcome to Grandma’s Crafts! Fine-thread snowflakes have a lovely way of making a Christmas tree or winter window feel a little more personal. This Flurry of Snowflakes collection by Elizabeth P. Williams offers four different styles, each with its own openwork shape and decorative details.
The designs use white crochet thread and a small steel hook, followed by shaping and stiffening to bring the finished outlines to life. Make one favorite or create an assortment for a tree, a mantel garland, or a hanging display. The original PDF brings all four styles together for your next quiet craft session.
Part of the fun is seeing how different each snowflake looks once its loops and points are arranged. Some have a wonderfully airy outline, while others bring more detail to the center. Making a few different styles gives you a collection that feels coordinated without every ornament looking exactly alike.
These little decorations are easy to pair with pieces you already bring out each Christmas. Hang them among colorful baubles, place a few against dark green branches, or tie one to a simply wrapped gift. The white thread lets the crochet details take center stage, especially when there’s a contrasting background behind them.
Set aside a little time for the finishing process, too. Arranging the loops and letting the stiffened pieces dry is what helps reveal their final shapes. It’s a satisfying moment when you lift a finished snowflake from the pinning surface and see all those small stitches come together into a decoration ready to hang.
Four Styles and Their Finished Sizes
The PDF gives the following measurements, taken from point to point:
Design
Finished measurement
Style 1
4.75 by 4.75 inches (12 by 12 cm)
Style 2
5.5 by 5.5 inches (14 by 14 cm)
Style 3
6.5 by 6.5 inches (16.5 by 16.5 cm)
Style 4
4.25 by 4.25 inches (11 by 11 cm)
The source displays both Easy and Intermediate skill labels, so it is better to view this as a collection with different demands than to label every design identically. Some styles rely heavily on chain loops, while the more detailed designs introduce tall stitches and picot features.
Read the full instructions for your chosen style before starting. A short design is not necessarily the easiest one, especially when its final shape depends on arranging long chain loops after crocheting.
Materials Used in the Collection
The source lists one ball of Aunt Lydia’s Classic Crochet Thread, Size 10, in White (001) and a 1.5 mm steel crochet hook, US size 7. The listed white thread ball contains 400 yards. The PDF does not give an exact yardage for each style or a guaranteed ornament count per ball.
You will also need a thread needle, rustproof pins, fabric stiffener, and ornament hangers. Scissors and a flat pinning surface suitable for your stiffener are useful additions. Check the product directions before preparing the drying area.
The stiffener is part of the source’s finishing process, not merely a suggestion added to this article. These fine loops need shaping to hold the decorative outlines shown in the photographs. Plan time for drying as well as crocheting when making the ornaments for a particular date.
Download the Free Pattern PDF
Keep the original pattern nearby for the complete stitch instructions, counts, and finishing directions. The notes below help you plan your project and choose materials.
The 1.5 mm hook works with the fine thread to produce delicate stitches. Steel-hook size numbers differ from the system used for larger yarn hooks; use the millimeter measurement to identify the intended tool.
Instead of giving a standard row-and-stitch swatch, the pattern uses each finished snowflake’s point-to-point measurement as the gauge reference. Your tension and the way you arrange the loops during finishing can influence that final size.
Make one ornament first and compare its shape and dimensions with its source photograph. If it differs significantly, review your stitch and loop counts before assuming the hook is the only cause. Shaping should arrange the design neatly, rather than disguise a missed repeat.
What Makes the Designs Interesting
Style 1 uses alternating long chain loops to build a very open outline. Its finished appearance depends on arranging those loops during the stiffening stage. The other styles introduce different combinations of grouped tall stitches, chain arches, and decorative picot loops.
Style 3 includes double treble crochet, written as dtr in US terms. Tall stitches provide height and space in the design. The PDF explains the special stitch, and practicing it separately can help if it is new to you.
Keep the original photographs nearby when planning your finishing. The name “snowflake” describes the decorative collection, but the shapes are varied. Do not assume every style follows the same number of points or the same layout of loops.
Ideas for a Tree, Garland, or Window
An assortment of the four sizes can make a tree feel collected and handmade. Place larger flakes where they have room to hang freely, and tuck the smaller styles among other ornaments without burying their outlines in the branches.
For a mantel garland, attach finished snowflakes individually to a ribbon or suitable cord after they have dried completely. This is a display idea rather than an additional crochet pattern in the PDF. Space them so neighboring points do not tangle together.
In a window, the open stitches can show clearly against the light. Keep the ornaments away from condensation or other damp surfaces that could soften the stiffened shapes. A small grouping at different heights can make an attractive winter display without filling the entire window.
Shaping and Stiffening with Care
Use the stiffener according to its own instructions; different products can require different preparation and drying methods. The PDF tells you to use the photograph as a guide to the finished shape.
Arrange the center first, then distribute the loops or points evenly around it. Rustproof pins help hold the thread while it dries. Pin with enough support to preserve the outline without pulling the crochet so hard that the center distorts.
Let the snowflake dry fully before unpinning or adding the hanger. If you are making a mixed set, work one style at a time during shaping so you can concentrate on its particular arrangement. A quick photograph of the pinned piece can be a useful reference for the next matching ornament.
Thread Colors, Gifts, and Storage
White is the original color and gives the collection a familiar lacy winter look. Ecru could create a softer appearance, while another fine-thread color might suit a particular tree palette. Use the same type and scale of thread if you want to stay close to the original sizes.
These ornaments can be tucked into holiday cards or used as gift decorations, provided they are protected from bending. Let the recipient know they are handmade and stiffened, and share any relevant care guidance from the products you used.
Store the flakes flat between clean protective layers, without heavy decorations resting on their points. Keeping them dry and supported helps preserve the time you spent shaping the loops. Next season, you can bring out the whole collection and perhaps add another favorite style.
VIDEO TUTORIAL
Save the Pattern for Your Next Craft Session
Ready to make your own? Download the PDF below and read through the original directions before you begin. You can print it or keep it open beside your work so the pattern is easy to follow.
Pattern credit: Flurry of Snowflakes by Elizabeth P. Williams for Aunt Lydia’s/Coats & Clark, pattern ALC0518-024880M. Consult the supplied PDF for each style’s full instructions and shaping photographs.