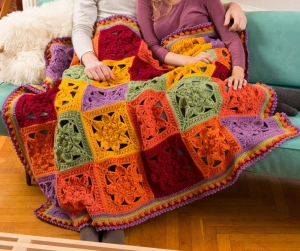
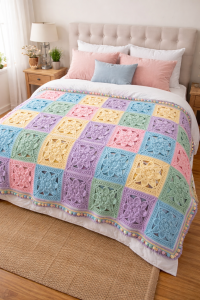
Hello, my dear friends, and welcome once again to our warm and cozy corner here at Grandma’s Craft. Today, I am so delighted to share with you a pattern that feels like a celebration of color, texture, and creativity a fabulous Fall Crochet Throw, made of charming motifs that come together like a patchwork of love.
There is something truly magical about motif-based blankets, don’t you think? Each little square holds its own story, and when they are joined together, they create something far greater than the sum of their parts. This lovely design, inspired by the original pattern found in , follows that same comforting rhythm we see in many beloved crochet projects, simple steps repeated with care, allowing even more detailed pieces to feel approachable and rewarding. Just like in other cozy crochet guides, working gradually and patiently helps build confidence while keeping the process peaceful and enjoyable .
At the heart of this blanket are the richly textured motifs, each one worked in the round and layered with beautiful stitches. From the very center, where the stitches form a soft circular base, the design begins to grow outward with delicate details, popcorn stitches that create a raised, floral-like texture, and post stitches that add depth and dimension. These elements give each square a unique personality, almost like tiny works of art made stitch by stitch.
As the rounds continue, the motifs gently transform from circles into squares, making them easy to join together later. This is one of the most satisfying parts of the process, my dear, watching your work evolve, seeing structure emerge from softness. The combination of stitches, from simple single crochet to more decorative techniques like crossed double crochet, creates a fabric that is both sturdy and full of visual interest.
The use of multiple colors is what truly brings this blanket to life. Each motif can be made in a different shade, creating a warm, autumn-inspired palette that feels vibrant yet harmonious. As noted in the pattern, arranging the motifs thoughtfully allows you to play with color placement, turning your blanket into a truly personal creation. It’s a gentle reminder that crochet is not only about following instructions, but also about expressing your own creativity.
Joining the motifs is where everything begins to feel complete. One by one, the squares come together, forming a larger piece that carries the warmth of every stitch you’ve made. It’s a moment that feels almost magical—like assembling a quilt of memories, each square representing time, care, and patience.
And then comes the finishing touch: the edging. This final step frames your blanket beautifully, adding texture and detail that ties everything together. The combination of stitches used in the border gives it a delicate yet sturdy finish, ensuring that your blanket will be both durable and elegant.
Materials
You will need:
- Medium weight yarn in several colors
- Crochet hook US H/8 (5 mm)
- Yarn needle
Finished size: approximately a large cozy throw (as noted on page 1)
Stitches (US Terms)
- ch = chain
- sc = single crochet
- hdc = half double crochet
- dc = double crochet
- tr = treble crochet
- sl st = slip stitch
- popcorn = textured cluster
- crossed dc = decorative crossing stitch
- front post stitches (dcfp, hdcfp, trfp)
This pattern combines texture and structure, creating a rich, decorative look.
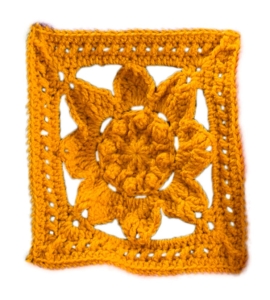
MAKING THE MOTIFS
You will create multiple square motifs (as shown in the layout diagram on page 3).
Each motif is worked in rounds.
Round 1 (Center Circle)
- Chain and join to form a ring
- Work double crochet stitches into the ring
This creates the base of your motif.
Round 2 (Texture Begins)
- Alternate front post stitches and single crochet
This adds depth and structure to the center.
Round 3 (Creating Spaces)
- Work single crochet and chain spaces
These spaces prepare for decorative stitches in the next round.
Round 4 (Popcorn Texture)
- Work double crochet and popcorn stitches
These create a raised floral texture in the motif.
Round 5 (Open Loops)
- Chain spaces are formed between stitches
This creates a soft, airy layer.
Round 6 (Petal Layer)
- Work groups of stitches into each space
These form petal-like shapes around the motif.
Round 7 (Shaping the Square)
- Work stitches along edges
- Create corners using taller stitches
Now your motif begins to take a square shape.
Round 8 (Expanding with Shells)
- Work shell stitches and chain spaces
This adds width and structure.
Round 9 (Filling the Sides)
- Add more stitches to build the square evenly
Round 10 (Decorative Detail)
- Work crossed double crochet stitches
This gives a woven, textured look.
Round 11 (Final Round)
- Work half double crochet and post stitches
This stabilizes the motif and prepares it for joining.
ASSEMBLY
Now comes the most magical part.
- Arrange your motifs following a layout (as shown on page 3)
- Sew or slip stitch them together
Take your time here—this is where your blanket truly comes together.
EDGING
Once all motifs are joined:
- Work several rounds around the entire blanket
- Use combinations of dc, sc, popcorn, and chain stitches
This creates a beautiful, decorative border.
FINAL TOUCHES
- Weave in all yarn ends carefully
- Gently smooth and shape your blanket
And just like that… your masterpiece is complete.
As we come to the end of our time together, I hope this fabulous Fall Crochet Throw inspires you to pick up your hook and create something truly special. Crochet is more than just making, it is about slowing down, finding comfort in repetition, and filling each stitch with a little bit of love.
Thank you for being here with me at Grandma’s Crafts, my dear. And don’t forget to explore our other articles—there are so many more cozy patterns and gentle inspirations waiting just for you.
You can print the complete tutorial for this pattern, designed by Kristen Stoltzfuz, from Yarnspirations, right now by clicking the button below.
FALL CROCHET THROWN PDF PATTERN
My dear, this blanket is a celebration of color, texture, and patience. Each motif tells its own little story, and together they create something truly special.
Take your time.
Enjoy each stitch.
And remember, there is love in every loop you make.


