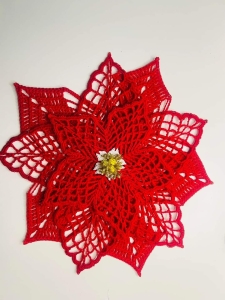
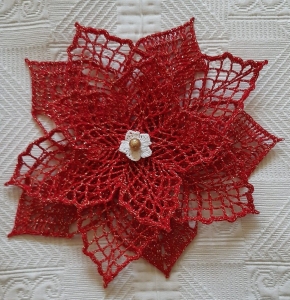
There is something especially beautiful about handmade Christmas decorations. They have a way of making a home feel warmer, cozier, and a little more personal. Today, I’d love to share a lovely Crochet Star of Bethlehem project that is perfect for the holiday season.
This design is made by creating three crocheted stars in different sizes and layering them together. The finished piece has a beautiful dimensional look and can be used as a Christmas tree ornament, wall decoration, centerpiece, or handmade holiday gift.
If you are still learning to crochet, don’t worry! I’m going to walk you through the project slowly and explain what each step means.
Before We Begin
This project uses several basic crochet stitches, along with a few taller stitches. If you are comfortable with single crochet and double crochet, you can take your time with the taller stitches and learn as you go.
The most important thing is not to rush. Count your stitches carefully, especially when creating the points of the star.
Crochet Star of Bethlehem
Materials
For this project, you will need:
Fine cotton crochet thread in red
Fine cotton crochet thread in white
A small crochet hook suitable for your thread
Scissors
Tapestry needle
Stitch marker
A piece of cardboard or foam board for blocking
Sewing pins
Fabric or craft glue for stiffening
A small brush
Optional: beads, pearls, or a small decorative button for the center
Suggested Colors
For a traditional Christmas look, I love:
Red + White + Gold
But you can easily personalize your star with colors such as:
White and silver
Cream and gold
Green and red
White and pale blue
Burgundy and ivory
Abbreviations (US TERMS)
The pattern below uses standard US crochet terminology.
ch – chain
sc – single crochet
dc – double crochet
tr – treble crochet
dtr – double treble crochet
sl st – slip stitch
st/sts – stitch/stitches
sp – space
rep – repeat
A quick note about the taller stitches
A treble crochet (tr) is taller than a double crochet.
A double treble crochet (dtr) is even taller. To make one, wrap your yarn around the hook three times before inserting the hook into the stitch.
If this stitch is new to you, work slowly and keep your tension relaxed.
PART ONE – LARGE STAR
The large red star will form the foundation of our decoration.
Round 1 – Creating the Center
Begin with a magic ring.
If you are not comfortable making a magic ring, you can instead chain 4 and join the first and last chains with a slip stitch to create a small ring.
Now:
Chain 1.
Work 15 single crochet stitches into the center of the ring.
Pull the beginning tail gently to close the center.
Join with a slip stitch to the first single crochet.
You should now have a small crocheted circle.
Tip: Place a stitch marker in your first stitch if you have trouble remembering where the round begins.
Round 2 – Starting the Star Points
Now we are going to transform the little circle into a five-pointed star.
Choose the first stitch as your starting point.
Chain 5.
The chain creates the beginning of one of the star’s long points.
Work the tall stitches required to build the point, then create a small chain space at the tip.
After completing the first point, move along the center circle and repeat the same idea around the piece.
The important thing to remember is that the five sections need to be spaced evenly.
Beginner Tip
Think of the star as having five little sections around the center.
You don’t want to make one point very large and another very small, so pause occasionally and check that your work looks balanced.
Round 3 – Building the Points
Continue working into the spaces created around the previous round.
For each point:
Work the taller stitches along one side.
Create a chain space at the tip.
Work the corresponding stitches down the other side.
Between the points, use the shorter stitches to keep the center sections neat.
Continue around until all five points have been formed.
Join the round with a slip stitch.
Making the Star Larger
From this point forward, the goal is to gradually lengthen the five points.
Work around the star, concentrating your stitches around the existing point sections.
At the tip of every point, maintain a small chain space. This keeps the point open and helps you create a crisp star shape.
With each additional round, the sides of the points become longer.
Important
You do not need to pull your stitches tightly.
A relaxed tension will make it much easier to see where your stitches belong.
Continue until the large star reaches approximately the size you would like for your decoration.
For a larger Christmas display, you can make the star around 10 inches across, but the final size will depend on your yarn, hook, and tension.
Finishing the Large Star
For the final edging, work a neat border around the outside.
When you reach the tip of a point, make a small chain space at the very top before continuing down the opposite side.
This little space helps define the five points.
Once you have completely outlined the star:
Join with a slip stitch.
Cut the yarn, leaving a small tail.
Pull the yarn through the final loop.
Thread the tail onto your tapestry needle.
Weave the end securely through the back of the stitches.
Set the large star aside.
PART TWO – MEDIUM STAR
Now we are going to make a second star that will sit on top of the first one.
This piece can be made in the same red shade or in another coordinating color.
The second star should be noticeably smaller than the first.
Round 1
Start with a magic ring.
Chain 1 and work a small circle of single crochet stitches.
Join the round with a slip stitch.
Again, place a stitch marker in the first stitch if needed.
Round 2 – Creating Five Petal Sections
We are now going to divide the circle into five sections.
In the appropriate stitch, work a combination of:
chain stitches
double crochet
treble crochet
another small chain space
treble crochet
double crochet
This combination creates a rounded section that will eventually become one of the star’s points.
After completing the first section, use a few chain stitches and single crochet stitches to move toward the next section.
Repeat the same arrangement around the circle.
You should finish with five evenly spaced sections.
Join with a slip stitch.
Extending the Medium Star
In the following rounds, work into the chain spaces created between the taller stitches.
Create an arch that extends outward from each section.
Then work back toward the center before moving to the next point.
Repeat around all five sections.
As you continue, the arches become longer and the star begins to take shape.
Don’t worry if it looks a little strange at first!
Crochet stars often look more like flowers while they are being worked.
The final shape becomes much clearer after blocking.
Continue until your medium star is approximately two-thirds the size of your large star.
Medium Star Border
For the final round, replace the taller stitches with shorter stitches around the outer edges.
At the very tip of each point, make:
3 sc, ch 3, 3 sc
This creates a defined point without making the edge too bulky.
Join with a slip stitch.
Fasten off and weave in the yarn ends.
PART THREE – SMALL WHITE CENTER
The final piece is the smallest star.
For this layer, use white cotton thread.
The construction is similar to the medium star, but this time we are going to stop much earlier so that the finished piece remains small.
Begin with a magic ring and create the center circle.
Then form five evenly spaced sections around the circle.
Work a few rounds of increasing arches around those sections.
Stop once the piece has reached the desired size.
The little white star should sit comfortably inside the medium star without covering all of its points.
Finish with a simple single crochet border.
At each point, remember to create a small chain space so the five tips remain clearly defined.
Fasten off and weave in the ends.
BLOCKING THE THREE STARS
Blocking is especially helpful for this project because it gives the points a much cleaner shape.
You will need:
A piece of cardboard or foam board
Sewing pins
Diluted craft glue
A small brush
Place the large star on the board.
Gently stretch each point outward until the five points are similar in size.
Pin the star in place.
Do the same with the medium and small stars.
Adding Stiffness
Mix your craft glue with water according to the product’s instructions.
Using a small brush, lightly coat the crocheted pieces.
You don’t need to completely soak them.
The purpose is simply to give the thread enough stiffness to hold the star’s shape.
Let everything dry completely before removing the pins.
Important Beginner Tip
Don’t remove the pins while the pieces are still damp.
The star needs to dry completely in its stretched position.
ASSEMBLING THE STAR OF BETHLEHEM
Now comes my favorite part!
Place the large star on a flat surface.
Take the medium star and place it over the center of the large one.
Turn it slightly so that its points sit between the points of the larger star.
This creates a beautiful layered effect.
Finally, place the small white star in the center.
Take a moment to adjust all three layers until they look symmetrical.
Once you are happy with the arrangement, secure the layers together using a small amount of craft adhesive suitable for your materials.
Allow the adhesive to dry completely.
Adding the Finishing Touch
For a little extra Christmas sparkle, you can add:
A small pearl
A gold bead
A decorative button
Several tiny beads
A small crocheted circle
Place the decoration in the center of the white star.
If you would like to hang your finished piece on the Christmas tree, attach a small loop of thread to the back.
How to Use Your Crochet Star
There are so many ways to enjoy this handmade decoration!
You can use it as:
A Christmas tree ornament
A wall decoration
A holiday table centerpiece
A handmade Christmas gift
A decoration for a wreath
A beautiful addition to a holiday display
You can also make several stars in different sizes and arrange them together for a lovely Christmas wall display.
A Few Tips for Beginners
Keep your tension relaxed
Tight stitches can make the tall stitches difficult to work.
Count your sections
Because the design has five points, check your work regularly to make sure the sections are evenly distributed.
Don’t skip blocking
Blocking makes a huge difference with star-shaped crochet projects.
Make your own color combination
Don’t feel limited to traditional Christmas colors. A white star with silver accents can look beautiful, while cream and gold create a softer vintage feel.
VIDEO TUTORIAL
Final Thoughts
I absolutely love how a few simple pieces of crochet can come together to create something that feels so special for Christmas.
The three layers give this Star of Bethlehem wonderful dimension, while the different colors make each section stand out beautifully.
And remember, your first one doesn’t have to be perfect. Handmade projects have their own little personality, and that’s part of their charm.
If you enjoyed making this star, consider creating a few more in different sizes and colors. They would make such sweet handmade gifts for family and friends.
Happy crocheting, sweet friends, and may your Christmas season be filled with warmth, creativity, and lots of beautiful handmade moments!