Hello, my dear crochet friends, and welcome to Grandma’s Crafts! I’m so happy you stopped by today. Here, we love the simple joys of crafting, the comfort of working with yarn, and the special feeling that comes from creating something with our own two hands. So, pull up a cozy chair, grab your favorite crochet hook, and stay awhile. There’s always a little handmade inspiration waiting for you here! 🧶❤️
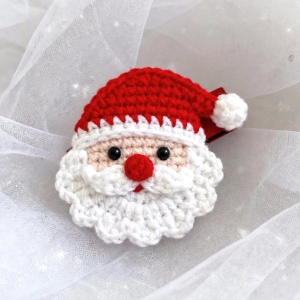
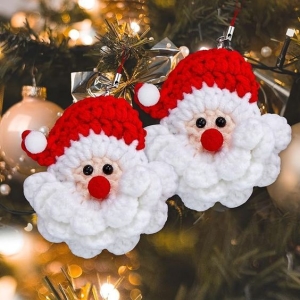
There’s just something extra special about handmade Christmas decorations, don’t you think? Every time I bring out the ornaments I’ve made over the years, I’m reminded of quiet afternoons with my crochet hook, a cup of something warm nearby, and the joy of making something with my own two hands. That’s exactly why I have such a soft spot for little Christmas projects like this sweet Crochet Santa Claus Ornament.
This cheerful little Santa is such a lovely way to add a touch of handmade warmth to your Christmas tree. With his jolly face, fluffy white beard, and classic red hat, he has all those familiar little details that make Christmas feel like Christmas. And the best part? You don’t need to be an expert crocheter to give him a try. The project uses simple stitches and small pieces, making it a wonderful choice for beginners who would like to practice their skills while creating something festive and useful.
I also think these little Santas would make the sweetest handmade gifts. You could crochet several of them to give to friends and family, add one to a wrapped present, or make a little collection for your own tree. Handmade ornaments have a way of becoming part of our holiday memories, and years from now, I hope you’ll smile when you unpack these little Santas and remember the cozy afternoons when you made them. So grab your favorite red and white yarn, settle into your favorite chair, and let’s make a little Christmas magic together, one stitch at a time.
Christmas is one of those magical times of year when handmade decorations seem to make everything feel a little warmer and more special. If you love adding a personal touch to your Christmas tree, today’s little project is just for you!
This Crochet Santa Claus Ornament is a cheerful and beginner-friendly project that uses simple crochet stitches and a few easy finishing touches. It is small, festive, and a wonderful way to use some of those little amounts of yarn left over from other projects.
You can make one for your own Christmas tree, create several in different colors, or turn them into sweet handmade gifts for family and friends.
About This Pattern
This Santa ornament is worked in a few simple sections and then assembled to create the finished decoration.
You will use basic stitches such as single crochet, half double crochet, double crochet, and slip stitch. Don’t worry if you are still learning! I’ll explain each part slowly so you can follow along comfortably.
Skill Level: Beginner Finished Size: Approximately 4–5 inches tall, depending on your yarn and tension Crochet Terms: US terminology
Materials
You will need:
Worsted-weight yarn in beige or skin-tone color
Red yarn
White yarn
A small amount of black yarn
Crochet hook suitable for your yarn
Yarn needle
Scissors
A small amount of stuffing
Two small safety eyes or black embroidery thread
Stitch marker, if helpful
You can also substitute the colors to create your own version of Santa. A slightly sparkly white yarn would be especially cute for the beard and hat trim!
Abbreviations (US TERMS)
MR – Magic Ring
ch – Chain
sc – Single Crochet
hdc – Half Double Crochet
dc – Double Crochet
sl st – Slip Stitch
st(s) – Stitch(es)
inc – Increase, 2 stitches worked into the same stitch
dec – Decrease
FO – Fasten Off
Santa’s Face
Let’s begin with the little face. This part forms the base of our ornament.
Round 1
Using beige yarn, make a magic ring.
Ch 1, then work 8 sc into the ring.
Pull the ring closed and join with a sl st to the first sc.
Total: 8 stitches
Round 2
Ch 1.
Work 2 sc in each stitch around.
Join with a sl st.
Total: 16 stitches
Round 3
Ch 1.
1 sc in the next stitch, 2 sc in the following stitch.
Repeat around.
Join with a sl st.
Total: 24 stitches
Round 4
Ch 1.
1 sc in each of the next 2 stitches, 2 sc in the next stitch.
Repeat around.
Join with a sl st.
Total: 32 stitches
Round 5
Ch 1.
Work 1 sc in every stitch around.
Join with a sl st.
Fasten off and weave in the end.
You should now have a small round shape that will become Santa’s face.
Santa’s Beard
Now comes the fun part—the fluffy beard! 🤍
Using white yarn, attach your yarn near the lower portion of Santa’s face.
We will create small scallops so the beard has a soft, decorative edge.
Beard Row 1
Ch 1.
Work 1 sc in the next stitch.
In the following stitch, work:
1 hdc, 2 dc, 1 hdc
Then work 1 sc in the next stitch.
Continue this sequence across the lower portion of the face.
The little groups of taller stitches will create rounded sections that resemble Santa’s beard.
Fasten off and weave in the end.
Adding More Beard Texture
If you want a fuller beard, you can add another row of small white scallops along the lower edge.
For each section, work:
sc, hdc, dc, hdc, sc
This gives the beard a soft, fluffy appearance without making the ornament too bulky.
Santa’s Hat
Now we can add Santa’s famous red hat!
Attach red yarn at the upper edge of the face.
Instead of working the hat as a separate piece, we’ll build it gradually so it sits naturally over Santa’s head.
Hat Row 1
Ch 1.
Work sc stitches across the upper portion of the face.
Turn.
Hat Row 2
Ch 1.
Work 1 sc across the row.
Turn.
Hat Row 3
Ch 1.
Sc2tog at the beginning of the row, then continue with sc stitches until you reach the last two stitches.
Sc2tog.
Turn.
Hat Row 4
Repeat the previous row.
The hat should now begin narrowing toward the top.
Continue decreasing at both ends of each row until only a few stitches remain.
Fasten off, leaving a longer yarn tail.
Use the yarn needle to gently secure the top of the hat toward one side. This creates the cute floppy shape that makes Santa’s hat instantly recognizable.
White Hat Trim
Santa definitely needs a fluffy white hat trim! ☁️
Attach white yarn along the bottom edge of the red hat.
Work a row of sc stitches across the edge.
For a fuller trim, you can work small clusters such as:
sc, hdc, sc
Repeat across the edge.
Fasten off and weave in the end.
Don’t worry about making every stitch perfectly even. A slightly fluffy, handmade appearance makes Santa even more charming!
Santa’s Pompom
For the pompom, use white yarn.
Make a small puff or bobble at the tip of Santa’s hat.
A simple version can be made by working several partial dc stitches into the same stitch and then pulling the loops together.
Secure the pompom firmly to the tip of the hat.
If you prefer, you can also sew on a tiny yarn pompom instead.
Santa’s Nose
The nose is wonderfully quick to make.
Using a small amount of red or pink yarn:
Round 1
Make a magic ring.
Work 6 sc into the ring.
Pull the ring closed and join with a sl st.
Fasten off, leaving a yarn tail.
Use your yarn needle to attach the little nose near the center of Santa’s face.
A tiny bit of stuffing can be placed inside before closing if you want the nose to look slightly raised.
Santa’s Eyes
Now Santa is starting to come to life! 😊
You can use small safety eyes, if appropriate for your project, or embroider the eyes with black yarn.
Place the eyes evenly above the beard and below the hat.
If embroidering them, make a few small stitches in the same spot until you achieve the size you like.
Adding Santa’s Mustache
For an extra sweet detail, add a tiny white mustache.
Cut a short piece of white yarn and attach it beneath the nose.
You can make two small curved sections by sewing the yarn outward from the center.
This little detail gives Santa a lovely traditional look!
Creating the Hanging Loop
Your Santa needs a way to hang on the Christmas tree. 🎄
Cut a piece of yarn approximately 8–10 inches long.
Fold it in half and pass the folded end through the top of the ornament.
Pull the loose ends through the loop and tighten gently.
Tie the ends together at the top to create a secure hanging loop.
You can use white, red, gold, or green yarn for the hanger.
Finishing Your Santa Ornament
Before calling your project finished, take a moment to check all the little details.
Make sure:
The hat is securely attached.
The beard is lying flat.
The nose is firmly sewn on.
The eyes are positioned evenly.
All yarn ends are woven in securely.
The hanging loop is strong enough to support the ornament.
And there you have it!
Your adorable little crochet Santa is ready for Christmas. 🎅❤️
Make It Your Own
One of my favorite things about handmade Christmas decorations is that there really isn’t only one right way to make them.
Try a darker red for a traditional Santa, or experiment with burgundy, cream, green, or even a little metallic yarn.
You can also make several Santas with different facial expressions. Imagine a whole collection of tiny Santas hanging together on your Christmas tree!
These ornaments would also make lovely additions to wrapped presents, Christmas stockings, gift baskets, or handmade holiday packages.
A Little Christmas Crafting Tip
If you’re making several ornaments, make all the face pieces first, then all the hats, and finally all the beards and finishing details.
Working in small batches can make creating a whole set much quicker—and it’s also a lovely project to work on while enjoying your favorite Christmas movie.
Final Thoughts
I hope this little Santa Claus ornament brings a smile to your face!
There is something so special about decorating a Christmas tree with things made by hand. Each little ornament carries a bit of time, creativity, and love, and that makes it much more meaningful than something picked up from a store.
So grab your favorite Christmas yarn, make yourself a cozy cup of something warm, and let’s start crocheting!
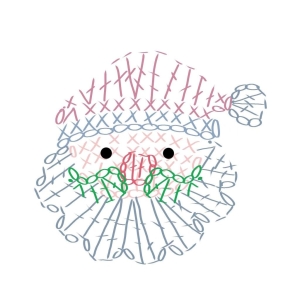
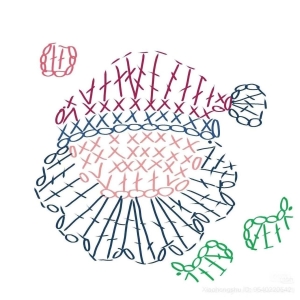
SANTA’S GRAPH
VIDEO TUTORIAL
I hope you had as much fun making this little Santa as I did! There’s nothing quite like filling our homes with handmade touches during the holidays, and I hope this sweet ornament finds a special place on your Christmas tree or brings a smile to someone you love. Thank you so much for spending a little time here at Grandma’s Crafts. Until we meet again, keep your hook busy, your heart happy, and your home filled with handmade love. Wishing you and your family a warm, peaceful, and joyful Christmas season!
Happy crocheting, dear friends, and Merry Christmas!