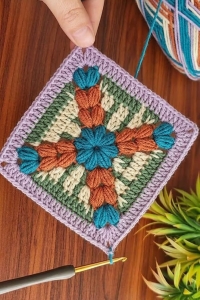
Hello, and welcome to Grandma’s Crafts! If you love a granny square with a little texture and a soft, old-fashioned feel, come take a look at this one with me.
The Farmhouse Granny Square begins with a small circle of stitches that almost looks like a flower. On the next round, four of its spaces become corners, and the familiar square shape starts to appear. The cluster stitches give the corners a lovely raised detail, while the double crochet sides keep the motif easy to build.
You can stop after five rounds for a smaller square or add the two optional rounds at the end. Either way, make one square first and check that it lies flat before making a whole stack of them.
This square looks lovely in a single color, where the raised stitches can speak for themselves. You can also change colors between rounds to make the little flower at the center stand out. Try it with yarn you already have and see which version feels most at home with your project.
Once you have made your first square, you might find yourself planning a cushion cover or gathering enough for a blanket. I like to lay a few squares side by side before choosing the next color. It is a simple way to see how the pattern will look when the pieces come together.
As you work, pay attention to the chain spaces beside each corner. They are where the sides gain their new stitches, round by round. The instructions below walk you through the square in US crochet terms, with stitch counts you can check as you go.
Materials
DK-weight yarn in one or more colors
A 4.5 mm crochet hook
Scissors
Yarn needle
Your finished size will depend on your yarn and tension.
Abbreviations (US crochet terms)
ch: chain
sc: single crochet
dc: double crochet
sl st: slip stitch
sp: space
dc2tog: two double crochet stitches closed together
dc3tog: three double crochet stitches closed together
Beginning 2-dc cluster: Ch 2, then make 1 dc in the indicated space. For this pattern, the ch-2 and dc form the first two-leg group.
Beginning 3-dc cluster: Ch 2, then make a dc2tog in the indicated space. The ch-2 forms the first leg visually.
dc3tog cluster: Work three incomplete dc stitches in the same space. You will have four loops on your hook. Yarn over and pull through all four loops.
The turning chains used for a beginning cluster are part of that cluster. When joining a round, slip stitch into the top of the completed dc or dc2tog, as indicated, rather than into the turning chain.
Before you begin
The center has eight ch-2 spaces. In Round 2, you will use alternating spaces: one for a corner, the next for a side. By the end of that round, count four corners and four sides.
For color changes, fasten off at the end of a round and join the new color in the space where the next round begins. If you are keeping the same color, slip stitch across to that space instead.
Foundation: Ch 4 and join with a sl st to form a ring.
Round 1: Ch 2, make 1 dc in the ring to form the beginning 2-dc cluster. Ch 2. Work (dc2tog in the ring, ch 2) seven times. Join with a sl st in the top of the beginning dc.
Check: You should have 8 two-leg groups and 8 ch-2 spaces.
Round 2: Join your yarn in any ch-2 space. This will be your first corner. In that space, work a beginning 3-dc cluster, ch 2, then a dc3tog cluster.
Ch 2 and work 3 dc in the next ch-2 space for the first side. Ch 2. In the next ch-2 space, work (dc3tog, ch 2, dc3tog) for the next corner.
Continue around in the same order, placing a corner pair in every other ch-2 space and 3 dc in each space between corners. Keep a ch-2 space between every corner cluster and side group. After the fourth side group, ch 2 and join with a sl st in the top of the beginning cluster.
Check: You should have 4 corners and four 3-dc sides.
Round 3: Begin in any corner ch-2 space. Work (beginning 3-dc cluster, ch 2, dc3tog) in that corner.
For each side, ch 2, work 2 dc in the first side ch-2 space, 1 dc in each of the 3 dc from the previous round, then 2 dc in the next side ch-2 space. Ch 2 before working (dc3tog, ch 2, dc3tog) in the next corner.
Repeat that side and corner sequence around. After completing the fourth side, ch 2 and join in the top of the beginning cluster.
Check: 7 dc along each side, between the two side ch-2 spaces.
Round 4: Begin in any corner and work (beginning 3-dc cluster, ch 2, dc3tog).
On each side, ch 2, work 2 dc in the first side ch-2 space, 1 dc in each of the next 7 dc, and 2 dc in the second side ch-2 space. Ch 2 before the next corner pair. Continue around all four sides and corners, then join.
Check: 11 dc along each side.
Round 5: Work the corners and sides as in Round 4. On each side, place 2 dc in the first side ch-2 space, 1 dc in each of the next 11 dc, and 2 dc in the second side ch-2 space. Keep ch 2 between the two clusters at every corner. Join and fasten off.
Check: 15 dc along each side.
Your Farmhouse Granny Square can finish here. Weave in the ends, then gently shape the corners.
Optional larger square
Round 6: Join your yarn in any corner ch-2 space. Work (beginning 3-dc cluster, ch 2, dc3tog) in the corner. For each side, ch 2, work 2 dc in the first side ch-2 space, 1 dc in each of the next 15 dc, and 2 dc in the second side ch-2 space. Ch 2 before the next corner. Continue around and join.
Check: 19 dc along each side.
Round 7, simple edging: Join your yarn in any corner ch-2 space. Ch 1, then work (2 sc, ch 1, 2 sc) in that corner.
Along each side, work 1 sc in the top of the first corner cluster, 2 sc in the side ch-2 space, 1 sc in each of the 19 dc, 2 sc in the next side ch-2 space, and 1 sc in the top of the next corner cluster. Work (2 sc, ch 1, 2 sc) in the next corner space. Repeat around the square and join with a sl st in the first sc. Fasten off and weave in the ends.
If the edging pulls the corners inward or the sides begin to ripple, check your stitch placement before making more squares. A small change in tension can make a noticeable difference on a motif this size.
And there it is: a textured little square that is lovely on its own and especially satisfying when you start lining up a few colors together.
VIDEO TUTORIAL
Thank you for spending a little time with us here at Grandma’s Crafts. I hope you enjoy making your Farmhouse Granny Square and have fun choosing the colors for your project. Good luck with your first square!
Before you go, take a look at some of the other patterns on the site. We share new ones every week, so I hope you’ll come back and visit us again soon. Have a wonderful week, and happy crocheting!