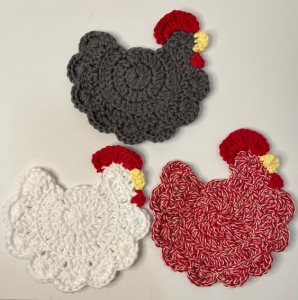
Hey there, lovely! Welcome to our cozy corner here at Grandma’s Crafts! 💖 I’m so thrilled you’re joining us today because I’ve got the sweetest little crochet treat just for you! Today, we’re diving into a pattern that’s as cute as it is charming, and I’m pretty sure it’s gonna win your heart! It’s simple, absolutely adorable, and works beautifully as a decoration or even as a fun add-on to other projects. Let me introduce you to… the chicken coaster! 🐥💫
Get ready to fall in love with this charming little pattern – it’s a total crowd-pleaser and the perfect project for a warm, handmade touch. So, grab your yarn, settle in, and let’s crochet up some smiles together!
These cutie-pie coasters bring such a quirky, playful vibe while still being totally practical. The best part? Whipping up a few of these little guys is super doable, even for a crochet newbie! You can easily make a whole set in just a couple of afternoons. If you’re on the hunt for a way to sprinkle a little whimsy and functionality into your decor, these crochet chicken coasters are the perfect DIY project.
Why Crochet Chicken Coaster? 🐔
Not only do these crochet chicken coaster keep your surfaces safe from spills, but they also add a cheerful, rustic charm to your space. Handmade with tons of love and care, each coaster shows off the heart and soul of crochet. I don’t know about you, but there’s just something about chickens that screams “kitchen vibes,” right? They’ve got such a fun personality, and that cute, friendly look just fits perfectly. These coasters are ideal for anyone who’s got a soft spot for all things chicken!
Made with patience and a whole lot of heart, these mini chicken coaster use traditional crochet techniques to bring the adorable little birds to life. With their colorful threads and playful textures, they’re not just a spot for your cup—they’re a whole decor statement! Every stitch adds a warm, homey feel, making each coaster a unique, handcrafted piece of art.
A Creative Canvas for Your Personality 🎨
Besides being practical, crochet chicken coaster give crafters a way to express their personality and add that special touch to their space. With so many colors and patterns out there, you can customize your chickens to match your style or even experiment with wild colors for a funky twist. Plus, they make fantastic little gifts!

Chicken Coaster
Chicken Coaster: A Thoughtful Gift Idea 💝
Whether you’re looking for a sweet gift for friends and family or just want to add something extra special to your own home, crochet chicken coasters are a charming way to celebrate the beauty of handmade crafts. You can mix and match colors, create unique sets, and bring a smile to anyone’s face with these cute, one-of-a-kind pieces.
Happy crocheting, and enjoy every stitch! 🧶
Materials Needed
Crochet Hook: Size F (3.75mm)
Yarn: Worsted weight (approx. 15 yards for the main color; scraps work well for the red and yellow sections)
Scissors
Darning Needle
Dimensions
Final Size: 4.5 inches (11 cm) in diameter
ABBREVIATIONS (US Terms)
Ch – chain
Sc – single crochet
Dc – double crochet
Ss – slip stitch
Sk – skip
St(s) – stitch(es)
Sc2tog – single crochet next 2sts together
TIP: When wrapping up your project, especially with tiny pieces like the wattle, comb, or beak, it can get a little tricky. A helpful trick is to weave the ends under the double crochet stitches in the shell on the back of your work. This will keep everything secure and neat!
CHICKEN COASTER – PATTERN INSTRUCTIONS
Main Body
Note: Round 1 is the only round worked in a circle. All subsequent rounds are worked in rows. Each ch3 counts as a double crochet (dc).
Starting the Magic Circle: Begin by making a magic circle. Chain 3 (this counts as your first double crochet), then work 11 more double crochets (dc) into the circle. Slip stitch (ss) into the top of the ch3 to join.
Round 1: Ch3 (this counts as a dc). In the same stitch as the last slip stitch, work 1 dc. Then, work 2 dc in each stitch around. Slip stitch into the top of the ch3 to join. (You should have 24 stitches total.)
Row 2: Ch3 (counts as a dc). *Work 2 dc in the next stitch, then 1 dc in the next stitch*. Repeat from * to * 8 more times. Dc in the next 2 stitches, then turn your work. (This will give you 30 stitches, with 3 stitches left unworked in this row.)
Row 3: Ch3 (counts as a dc). Work 1 dc in the next stitch. *2 dc in the next stitch, then 1 dc in the next 2 stitches.* Repeat from * to * 8 more times. Dc in the next stitch, then dc into the top of the ch3 from the previous row. Turn your work. (Now you have 40 stitches.)
Row 4: Ch1. *Skip the next stitch, then work 6 dc in the next stitch, skip the next stitch, and slip stitch in the next stitch.* Repeat from * to * 7 more times. Then, single crochet in the next 5 stitches. Work 6 dc in the next stitch, skip the next stitch, and slip stitch in the top of the ch3 from the previous row. (You should have 9 dc shells and 5 sc stitches.)
Finish: Cut the yarn, pull it through the last stitch, and weave in all ends to secure.
WATTLE
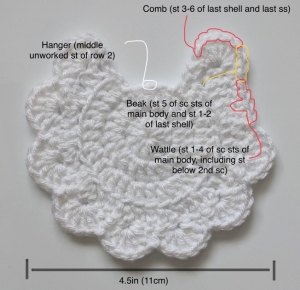
Position your work with the right side facing you. Attach the red yarn at the first single crochet of the previous row, right after the slip stitch, exactly where the eighth shell ends. For additional instructions, refer to the next page.
Chain 1. Work 3 single crochet stitches in the next stitch of the row below. Skip the following stitch. Slip stitch into the next stitch. Cut the yarn, pull it through the loop on the hook, and weave in the ends.
COMB
Starting from the right side of your work, attach the red yarn to the third stitch in the ninth shell (see next page for more details).
Chain 1. Then, repeat the following sequence 2 double crochet, chain 1, 2 double crochet in the next stitch two more times. Finish by slip stitching into the next stitch.
Cut the yarn, pull it through the last stitch, and weave in all loose ends to secure.
Let me know if you’d like any more changes!
Beak
With the right side facing you, attach the yellow yarn to the last single crochet (sc) of the fifth sc in the last row of the main body. For additional guidance, refer to the next page.
Ch 1, then single crochet (sc) in the next 2 stitches. Turn your work.
Next, single crochet two stitches together (sc2tog) for the next two stitches.
Cut the yarn, pull it through the last stitch, and weave in all loose ends.
HANGER (Optional)
Flip your work so the back side is facing you.
With the main color yarn, attach it to the middle stitch of row 2 (more details can be found on the next page).
Chain 12 stitches.
Join with a slip stitch in the same stitch where you attached the yarn.
Cut the yarn, pull it through the stitch on your needle, and weave in any loose ends to tidy up.

CHICKEN COASTER VIDEO TUTORIAL
If you’re a visual learner and prefer video tutorials, we’ve got a super helpful one for you! This video will guide you step-by-step in making your adorable chicken coasters. It’s from the YouTube channel Bag-O-Day Crochet. You can check it out below:
We’re so thankful to have you here in our cozy crochet community! We hope your chicken coasters turn out absolutely beautiful. Know someone who’d love this pattern? Don’t wait—share it with them now!
Here at Grandma’s Crafts, we’re always excited to bring fresh and fun patterns to our lovely readers, so we’re constantly updating with new ideas. Be sure to check out our other articles and explore all the free patterns we have to offer!
These crochet chicken coasters are the perfect addition to any home, adding a handcrafted touch that shows off your creativity. Whether you’re a seasoned pro or a beginner looking for a fun project, these coasters are sure to make your crafting experience even more enjoyable.
Wishing you an amazing day, and I can’t wait to see you back here soon!
Happy crocheting! 💕


